Monday, February 23, 2015

Exporting data from SQL Server 2012 to an Excel file

The AdvTest.xls file was used in creating a PowerBI Preview report as described here:
http://hodentek.blogspot.com/2015/02/powerbi-preview-reports-using-data-on.html

The EXCEL file AdvTest.xls was created using the Export/Import Wizard that comes with an installation of SQL Server 2012. DTS Wizard alias Export/Import Wizard is an extremely versatile tool to import/export tables and view data.

The Wizard file is located here: C:\Program Files (x86)\Microsoft SQL Server\110\DTS\Binn\DTSWizard
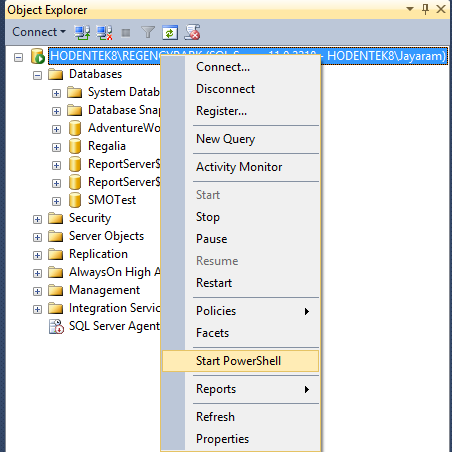
You can launch the Export/Import Wizard by double clicking the above or from the SQL Server Management Studio.

SSMS_Wiz

The Choose a Data Source page is displayed. Provide the needed information as shown (the details (herein details are for the SQL server 2012 server on this laptop with the AdventurewOrks2012 database). The authentication is Windows. You only need to indicate the server name and then use drop-down to pick Adventureworks2012.

Excel1.png

 
Click Next. This brings up the Choose a Destination page as shown. As we need to get the SQL Server data into an Excel file use the drop-down handle to bring up Microsoft Excel as shown. Provide a path for the EXCEL file by including the full extension of the Excel file (Herein AdvTest.xls). This file will be created. The versions of Excel supported are as shown here. Note that the more recent versions are not supported.


ExcelVersions.png

Filled in details for the Excel file to be created are as shown in the next screen shot.
Excel2.png

Click Next opens the screen shown next.
Excel3.png

Accept the default and click Next. The Select Source Tables and Views window is displayed as shown.
Excel4.png

Click Next. The Review Data Type Mapping window is displayed as shown. Some changes to the choice of tables and views were made by going backwards and forwards from this screen..
Excel9x.png

Do not make any changes and click Next.

The Save and Run Package page is displayed. Accept defaults and click Next. After reviewing the transform details the final processing windows is displayed as shown.
Excel10.png

When operation is completed you will see the 'Success' window as shown:

ExcelFinal.png

This completes the exporting a set of tables and views from SQL Server 2012 to an Excel file. Few of the screen shorts were not shown. You will find the AdvTest.xls file in the path you provided earlier.

Note than on a x64bit Windows 8.1 machine you will not be able to view this file if Office is not installed on the machine.

Saturday, February 21, 2015

Creating a Microsoft SQL Server Integration Services using SSDT in SQL Server 2012

This post describes creating a SQL Server Integration Services using SSDT that installs with the installation of SQL Server 2012

SQL Server  Data Tools(SSDT) installs when you install SQL Server 2012 (even the SQL Server 2012 Express edition). SSDT has all the necessary project templates to start a Business Intelligence project. However it will not have the templates for other language projects such as C#, VB.NET etc.
 
Launch SSDT from its short cut in All Programs. Review the details fo the Visural Studio Shell from File | About Microsoft Visual Studio. The following window will be displayed for Visual Studio 2010 Shell. The programs not available are all greyed out but you can that all the BI related programs are enabled.


SSIAProj01

The Start page gives you access to create a New Project, Open a project and it also lists out the Recent Projects that you can bring up as shown.

SSIAProj02

Click New Project to create a new project. The New Project window opens. Expanding the Business Intelligence node reveals all the BI related projects that you can create including the Integration Services project as shown. Note that the .NET Framework 4.0 is needed.
SSIAProj03

Click on Integration Services..Business Intelligence ant change project name to August. The default that comes up is Interation Services Project1 as shown.
SSIAProj04

A project is a container to develop Integration Services packages. Integration Services manages packages deployed to Microsoft SQL Servers Databases or SSIS Package stores. Integration Services is only available in SQL Servers. Once deployed to the Integration Services servers, the projects are managed by T-SQL and Stored Procedures in the SQL Server Management Studio.
The project may contain all the files needed for an ETL operation (Extraction, Transformation and Load).  The next figure shows the Solution Explorer for a project named August4.

SSIAProj05

SSIS 2012 is based on a project unlike the earlier version which was Package based.
Right click August 4 to access the project properties page as shown (the Common Properties node).
SSIAProj06

The Configuration properties in the debugging mode are as shown here:
SSIAProj07

The Project.params is an XML file persisted to the hard drive as shown.

SSIAProj08

SSIAProj09

The XML file has the following entry:

SSIAProj10

Connection Managers folder is a container for connection managers used in the project.

Similarly, the SSIS Packages is a container of SSIS Packages and presently it has the default package Package.dtsx. It can be renamed to a custom name of user’s choice.

Miscellaneous is a folder for other project related items.

Package Properties
 
The following components constitute a package and the tabbed pages under Package.dtsx gives access to them as shown. The Package Explorer shows the various folders associated with the Package as shown.

SSIAProj11

At the right extreme is the SSIS Toolbox. If the Toolbox items are not visible this button can be used to make them visible.  The Toolbox components should be visible when any of the Control Flow, Data Flow or Event Handlers pages are active.
The next figure shows the Toolbox items available.

 
Control Flow
List of tasks available, under ‘Other Tasks’ in the Toolbox, with Control Flow page tab is clicked.


SSIAProj12

The tasks under  Favorites, Common and Containers with the Control Flow Page active are shown.

SSIAProj13
 

Favorites and Common folders contain the following Components:

SSIAProj14

The ‘Other Transforms’ folder contains the following components:

SSIAProj15

The components in the ‘Other Sources’ and ‘Other Destinations’ are as shown here.
SSIAProj16

You may note that the SQL Server Integration Services in 2012 is much more feature rich with enhancements  when compared to its first time debut in SQL Server Integration Services in SQL Server 2005.

However, the methodology of creating packages follow very similar lines as before.

For a very exhaustive description of the Visual Studio IDE for the 2005 version is available in my book here:


You can buy this book here:
https://www.packtpub.com/networking-and-servers/beginners-guide-sql-server-integration-services-using-visual-studio-2005

or from  Amazon

http://www.amazon.com/Beginners-Server-Integration-Services-Visual-ebook/dp/B005CG8IKQ/ref=asap_bc?ie=UTF8


Tuesday, February 10, 2015

Authoring a report with Power BI using SQL Server 2012 data

This post provides a tutorial approach to authoring a report with Microsoft PowerBI using data on a  SQL Server 2012.

PowerBI is Microsoft's preview software that you can download for free if you are in USA. Probably it will be available to users in other countries as well. It is the latest iteration to provide a toll to the
non-programmer type who desires to create Ad-hoc reports easily without knowing too much of the innards of the data source but knowing all about their business.

Read here for more information:
http://hodentek.blogspot.com/2015/02/power-bi-unchained.html

Before you start authoring the report make sure your SQL Server is running and that you have downloaded and installed the PowerBI software from this location: http://www.powerbi.com/
The installation is very simple and takes only 4 interactive screens.

 
After the download PowerBI gets launched.


PowerBI08.png

On the left you have a navigation pane. You can click on the link and get to the task you want to accomplish. In the right hand pane you have a video you can watch to get started and a few other videos. You also have access to the forums; the PowerBi blog and several tutorials. You may
also opt out to not show this page in subsequent launches,

Click on Get Data. The Get Data page gets displayed as shown.

PowerBI09.png

Notice that you can also access data on your Azure as well as quite a large selection of data sources. The picture shows only half the resources. Scroll down and review the rest.

In this post, you will be connecting to an instance of SQL Server 2012 that contains a AdventureWorks2012 database.

Click SQL Server Database in the above image. You will be displayed a page with ttle Microsoft SQL Database and you will be importing data from a Microsoft SQL Server Database. As I mentioned earlier I will be getting data from an instance of SQL Server called RegencyPark. I will have to give the complete reference to this instance. Since my laptop is named Hodentek8, the complete refeerence is Hodentek8\RegencyPark and the name of the database I will be using.

PowerBI10.png

Click OK. You get the 'Access a Microsoft SQL Database' page displayed.
PowerBI11.png

Herein  you need to provide authentication information. Windows authentication was used during installation and so just click Connect at the bottom of the screen.

You will be displayed the Navigator pane showing all the tables in your
database as shown.

PowerBI12.png

Clicking on any of the tables you can see the details for that table in the Preview is Blank area as shown. If you remember a table name you can also search.
PowerBI13.png

 
You can select multiple tables to create a report. Here to keep it simple I have chosen the Sales.vSalesperson table and you can see a blank report shown as a rectangle bordered green.


PowerBI14.png
The designer has the typical Office look with Menu and toolbar menu. You can also see various  charts design templates for data visualization.
Click Load. You may also use the GetData and Recent Resources links to get
the data.

Hidden behind the image on the top of the above screen you will also find Fields pane at extreme right. It lists out all the columns in the Sales.SalesPerson table. Use the scroll-bar to see more of the fields.

In the fields pane I choose Last Name, SalesLastYear, SalesQuota and
Sales YTD and voila the report is generated. I could choose to create the type chart I like by choosing in the menu bar.


PowerBI16.png

I can immediately create another report (a new one) by choosing other different fields (TeritoryName, SalesYTD and SalesLastYear) as shown here. I need not get out of the designer and the first report also exists to which you can switch into by clicking on it. This is very much like Power View introduced in SQL Server Reporting Services 2012.


PowerBI18.png

That's all. No calculating X-axis, Y-axis etc. The type of tasks you do with Excel. This is as simple as it can get. I took a whole page to describe and I bet you can do it in 10 minutes.

A summary veriosn was presented here:
http://hodentek.blogspot.com/2015/02/spin-out-cutting-edge-report-with-power.html


Thursday, February 5, 2015

Creating a database using Power Shell and SQLServer Management Objects

Review this previous post    http://hodentekmsss.blogspot.com/2014/11/accessing-sql-server-via-smo-using.html

In the above post you will get an introduction to Power Shell and SQL Server maangement Objects. You also learn how to access the SQL Server and carry out a few tasks like listing out all the databases.

In this post you will learn how to create a new database in SQL Server using SMO and Power Shell. Using Transact-SQL or the SSMS you can easily create a database. Using PowerShell is another option to create a database using a script.

Launch Power Shell by right clicking the instnace node as shown.


PS_SMO_DB01

This ensures that you have access to the SQLServer's SMO library.

You will be launching the shell with the following line:
PS SQLSERVER:\SQL\HODENTEK8\REGENCYPARK>

Enter the following code one line at a time. After you enter the line and click enter you may not get any message. Continue with the other lines.

$server= new-object Microsoft.Sqlserver.management.smo.server 'Hodentek8\RegencyPark'
$dbname= "Feb6"
$db=new-object  Microsoft.Sqlserver.management.smo.Database ($server,$dbname)
$db.Create()


When the final command line is processed you will have created a new database Feb6 in your SQL Server Instance as shown. It will have default settings.


PS_SMO_DB02

Windows PowerShell ISE on Windows 8.1


While Windows PowerShell can be accessed by searching for PowerShell in Windows 8.1, the Windows PowerShell ISE is in the Windows Adminsitrative Tools.

WinPowershell02

A search for Administrative Tools brings up the following selection.


WinPowershell02

 
The following Power Shell related items can be found in this folder


WinPowershell03
There appears to be both a x32 bit version and a x64 bit version of Windows PowerShell ISE in Windows 8.1

I am not paying this invoice. I am disregarding it, becuase....

 I am not paying this invoice because MICROSOFT has not provided me with a satisfactory way to access my account since June of this year des...