Applications need access to data on the SQL Server. One of the methods is ODBC which stands for Open DataBase Connectivity, a standard way of accessing data using an intermediate piece called the driver. If you have a ODBC driver you can access any data from any application.
If you are writing an application to access data on SQL Server one of the easy ways is to go via using ODBC by creating a ODBC DSN which the application uses. This post is about creating a User DSN to connect to SQL Server 2016.
Just follow the steps from here on till the end of this post.
Click ODBCin the search box and pick up ODBC Data Source (x64) from the choices.
 ODBC_00
Click ODBC Data Sources(x64)
The ODBC Data Source Administrator (x64) windows opens as shown.
 ODBC_01
By default it opens in the UserDSN tab. We will create a UserDSN which limits us to this computr and this user (in this case, current user who has logged into this computer). Presently there are only two User DSN's.
Click Add to add a new UserDSN in this window. Create New Data Source window opens as shown.

ODBC_02
The ODBC Driver 13 for SQL Server is the one you should click. It points to the DLL, MSODBCSQL13.dll
Click Finish.
Create a New Data Source to SQL Server window gets opened as shown.

ODBC_03
You need to provide three pieces of information.
Name:
Description:
Which SQL Server do you want to connect to?:
Name can be your choice, here HSQL and description is optional; DSN for SQL Server 2K16
After entering these click on the handler for the next question, if there are no drop-down options it means there are no working SQL Server 2016 instance. Stay on this window and launch SQL Server 2016 from the start menu.

ODBC_04
I assume this functionality of the wizard to bring up the instance of SQL Server on the computer in the drop-down list is lacking. It is suppsoed to discover the SQL Server.
I made sure that SQL Browser is running.

ODBC_06
Click Next after entering the SQL Server Instance name for the Server in the format <computerName>\Instance name.

ODBC_05
The next window gets displayed where you need to enter the authenticaiton information as shown.

ODBC_07
Since windows integration was chosen during installation just click Next. The following window gets displayed.
ODBC_08
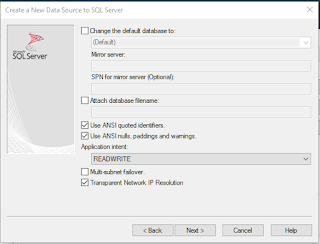
Just accept the defaults for now unless you want to change some. Click Next.

ODBC_09
In the next window you accept all the default choices
 ODBC_10
Click Finish.
Summary screen shows up as shown.

ODBC_11
You can test the DSN by clicking Test Data Source... .
The image shows the cconnectivty was tested. For this test to be successful the server should be up and running.

ODBC_12
Click OK.
Click OK.
Now you have the HSQL in the UserDSN tabbed page of the ODBC Data Source Admisnitrator as shown.

Click OK to say good bye to the administrator window.
If you are writing an application to access data on SQL Server one of the easy ways is to go via using ODBC by creating a ODBC DSN which the application uses. This post is about creating a User DSN to connect to SQL Server 2016.
Just follow the steps from here on till the end of this post.
Click ODBCin the search box and pick up ODBC Data Source (x64) from the choices.

Click ODBC Data Sources(x64)
The ODBC Data Source Administrator (x64) windows opens as shown.

By default it opens in the UserDSN tab. We will create a UserDSN which limits us to this computr and this user (in this case, current user who has logged into this computer). Presently there are only two User DSN's.
Click Add to add a new UserDSN in this window. Create New Data Source window opens as shown.

ODBC_02
The ODBC Driver 13 for SQL Server is the one you should click. It points to the DLL, MSODBCSQL13.dll
Click Finish.
Create a New Data Source to SQL Server window gets opened as shown.

ODBC_03
You need to provide three pieces of information.
Name:
Description:
Which SQL Server do you want to connect to?:
Name can be your choice, here HSQL and description is optional; DSN for SQL Server 2K16
After entering these click on the handler for the next question, if there are no drop-down options it means there are no working SQL Server 2016 instance. Stay on this window and launch SQL Server 2016 from the start menu.

ODBC_04
I assume this functionality of the wizard to bring up the instance of SQL Server on the computer in the drop-down list is lacking. It is suppsoed to discover the SQL Server.
I made sure that SQL Browser is running.

ODBC_06
Click Next after entering the SQL Server Instance name for the Server in the format <computerName>\Instance name.

ODBC_05
The next window gets displayed where you need to enter the authenticaiton information as shown.

ODBC_07
Since windows integration was chosen during installation just click Next. The following window gets displayed.

ODBC_08
Just accept the defaults for now unless you want to change some. Click Next.

ODBC_09
In the next window you accept all the default choices

Click Finish.
Summary screen shows up as shown.

ODBC_11
You can test the DSN by clicking Test Data Source... .
The image shows the cconnectivty was tested. For this test to be successful the server should be up and running.

ODBC_12
Click OK.
Click OK.
Now you have the HSQL in the UserDSN tabbed page of the ODBC Data Source Admisnitrator as shown.

Click OK to say good bye to the administrator window.


No comments:
Post a Comment