Tuesday, December 30, 2014

It was a mixed year, 2014

2014 was a mixed year. I lost my brother Dr. Vijaya Raghavan Krishnaswamy, a neuro-surgeon by profession. He left a void that cannot be filled.

I did not complete the book I was writing.

Regarding the blogs I did quite well with a record number of posts.
                                                 Year   Posts
Hodentek.blogspot.com           2013   94
                                                 2014   246

HodentekHelp.blogspot.com.  2013.  17
                                                 2014   56

HodentekMsss.blogspot.com   2013   34
                                                  2014  48
 
HoentekMobile.blogspot.com  2013   13
                                                  2014.  56

I started a new blog in 2014- http://hodentekPlus.blogspot.com.

I also found that a certain person was pilfering (http://hodentek.blogspot.in/2014/12/domain-name-service-dns-and-dns-changer.html) entire content from blog, my hardwork of about 10 years. I complained to Google without any success. I suppose this is not on Google's priority. Google wants every post that is stolen with proof of content stolen. There were over 900 posts in my blog and you can imagine the work involved.
 

Monday, December 15, 2014

Honolulu learning event: Basic SQL

You are welcome to attend my course at the Pacific Center for Advanced Technology Training (PACTT). Please register at the PCATT.org site.

Summary:

Databases, organized repositories of information, have become indispensable in today's world. In this introductory course you will learn about databases and the basics of Structured Query Language (SQL) including sorting, distinct, and aggregate functions and grouping of data. All SQL statements will initially be written from one table. Most practical, modern and relational databases will include a large number of tables. SQL queries have to access information from several tables. This course will then introduce you to querying more than one table. With this skill you will be able to query two or more tables in a database. This is a hands-on course.


New in 2015: You will also get an introduction to Power Shell.

Dates: (Section 1) Section 1 - Feb 17 - Mar 12, 2015; TTh; 5:30 pm - 7:30 pm; 10 mtgs.
Venue: Honolulu Community College;

Note: SQL Server 2012 Express will be used and a knowledge of SQL Server is not assumed. Students will be using the free version.

For details : Access http://pcatt.org/index.php/search and look up the course or write to:
Hodentek@live.com with course name in the Subject line.

Friday, December 12, 2014

Learn Querying SQL Server 2012 using LinqPad - Part 2

In Part 1 of this series I showed how you can connect to your instance of
SQL Server on your computer. If you have not seen this please go here:
http://hodentekmsss.blogspot.com/2014/12/learn-querying-sql-server-using-linq.html

In this post you will learn how the tables in the SQL Server database
AdventureWorks2012 are represented on the LinqPad and learn to run a few
statements or expressions to fetch information on the SQL Server to display in LinqPad.

This next image shows how the tables and other objects in SQL Server are
displayed grouped in LINQPad.

All the tables in HumanResources are grouped and you can expand to see
the individual tables in LinqPad. Also all the Stored procedures, Functions
and Views related to the HumanResources are shown under HumanResources in
LinqPad but they are shown under the object nodes Programmability |
StoredProcedures; Programmability | Functions and non-system Views in SSMS.

Evaluating Expressions in LinqPad

When you launch LinqPad and connect to SQL Server Instance as shown in the
previous post, the LinqPad UI appears as shown (only top part shown here).


Here the Green arrow at left (right pane) is a button which executes the statement or
query you enter the pane and it will show Execute(F5) if you hover over the
green button.

The one next to it shown in grey is the Stop button and stops the execution.  The next two icons when clikced displays the results either in rich text (Ctrl+Shift+T),or data grid (Ctrl+shift+G).

The Language drop-down has a number of options and to get the correct result
you should indicate whether it is C# Expression(appears as default) or the
other types shown here.


The Connection drop-down comes up with default <None> which means the query
will not be execcuted since it is not connected despite the fact that you see the connection on the left. When you click on the handle (downward pointing arrow) you will see that you can connect to the database shown in the left.


Querying examples:

1. Click the drop-down for Connection and choose AdventureWorks2012
2. Write an expression to evaluate
1+2+3  as shown and click the green arrow to execute the expression and you
will see the result in the results pane that gets displayed.


This is not really SQL related but the engine evaluates it.

3. Let us say we want to get all the Employees information from the
Employees table in the Human Resources group. Then create a new query by
clicking on the + tab right next to Query1 and enter

Employees

as shown(this will be Query2). Don't forget to click the green arrow to execute. You get the following displayed.


As far the results you have other options to review as shown in the next composite image


4. Let us do some filtering. Let us we need only two columns from the
Customers table
Type in C#Expression the following"

from c in Customers
select new {c.CustomerID, c.StoreID}

Click the green arrow for query execution and you will see the following:


5. Let us say you want to filter further to display fewer rows then you can type in the following and click execute.
from c in Customers
where c.CustomerID <10
select new {c.CustomerID, c.StoreID}


Click Execute and the following will be displayed:

6. Let us say you want it sorted in the increasing order of StoreID then you can do the following:
Type in the following:

from c in Customers.OrderBy(c=> c.StoreID)
where c.CustomerID <10
select new {c.CustomerID, c.StoreID}


Click Execute and after some processing you will see the following:


You have learnt in this post how to recognize the UI and how to run a few simple queries against the SQL Server 2012 database.

In the next Part(s) you will learn a few more topics

Thursday, December 11, 2014

Hands-on learning event in Honolulu -SQL Server Reporting Services 2012


This hands-on course will provide you with the ability to create cutting edge reports using Microsoft's latest reporting services product, SQL Server 2012.

The course is offered by the Pacific center for Advanced technology Training: http://pcatt.hawaii.edu/home

Report writing is one of the most important IT related jobs in an enterprise. This course if for you if you would like to master report writing/authoring using SQL Server Reporting Services. The course begins with a presentation of essential technical background, after which you will work through guided hands-on exercises. At the end of the course you will have gained:
• A solid understanding of how to interact with SQL Servers
• Knowledge and experience installing and configuring reporting Services
• A working knowledge of using Report Builder to author reports and deploy them to report server
• A working knowledge of Report Manager's ability to carry out administrative tasks related to all aspects of reports; creating shared data sources, folder and folder hierarchies on the report server, and report models; managing security and subscriptions; and configuring data driven subscriptions
• An understanding of how to embed report viewer controls in windows and web projects.


Venue: Honolulu Community College Honolulu Community College
874 Dillingham Blvd Honolulu, HI 96817-4598 Phone: (808) 845-9211
Official Website: honolulu.hawaii.edu/

Section 1 - Mar 31 - May 7, 2015; TTh; 5:30 pm - 8:30 pm; 12 mtgs

I will be using my latest book on SQL Server Reporting Services for this course:


Tuesday, December 9, 2014

Things you learn hands-on in my SQL Server Integration Services book

With over 24 hands-on exercises this book covers,
  • A detailed explanation of designing over 20 important SSIS tasks using hands-on examples.
  • Use of Visual Studio 2005's IDE as related to SSIS development.
  • Working with single and multiple tasks; working with more than 20 different tasks.
  • Connecting to Microsoft Access, Flat Files, Excel Spread Sheets, and third party vendor products such as Oracle.
  • Linking data source and data destination to a task.
  • Learn sending emails and understand FTPing with SSIS.
  • Transform data from a source going to a destination.
  • Using the scripting support provided by the IDE.
  • Learn tasks such as web service and XML new in SQL Server 2005.
  • Monitor the data as it is being transported, also new in SQL Server 2005
  • Understand event bubbling and Learn to handle events

  • Packed with over 24 hands-on examples; no experience of SQL Server Integration Services required. Knowledge of DTS helpful but not essential.

    Saturday, December 6, 2014

    Learn Querying SQL Server using LINQ - Part 1

    The easiest way to do this is to use the popular tool, LINQPAD. It is a great tool
    and you can download a free version here:
    http://www.linqpad.net/

    If you want a brief intro to LINQ review this link:
    http://hodentekhelp.blogspot.com/2014/12/what-is-linq.html

    In this post we will see how to connect to the SQL Server on your Computer. LINQPAD does a lot more than querying, but for now let us limit ourselves to the immediate task.

    Download LINQPAD. It is somewhat like WYSIWYG. You create the query or an expression in LINQPAD and the click of a button executes the query/expression/statement etc. LINQPAD brings the whole of .NET Framework to a very easy interface where you interact. It is also a small program and does not slowdown whatever you are doing.

    The specifics of connecting to SQL Server

    Download LINQPAD and launch the program which typially opens up as shown (don't be
    disappointed at this minimal screen, lot more hides behind).


    Now click on Add Connection in the top left pane. The Choose Data Context window
    is displayed as shown.
     
     
    Of the two panes, let us concern ourselves with the top panel. Assume the Default(LINQ to SQL). Click Next. The LINQ to SQL Connection window is displayed as shown.


    In the Provider field you have various radio button options and you can connect tot SQL Server, two versions of SQL Compact Edition and SQL Azure. Accept the default SQL Server and that is what this post is about.
    • Since our SQL Server Instance name is Hodentek8\RegencyPark enter this here.(SQL Server 2012)
    • Log on details default is OK because that is what we chose during installation.
    • Also accept that we want to display all in a tree-view
    • For specifying new or existing database, choose Specify new or existing database and click on the drop-down to reveal the databases on the local instance as shown.

     
    Choose Adventureworks2012. .Well, well you could include production data.
    Now the LINQPAD4 interface changes as shown. Accept all other fields and click the Test button.
    You should get a connection successful message as shown.

     
    Click OK. Well the LINQPAD4 is  now connected to SQL Server 2012 instance on your computer.


    In the next post we look at how to use this tool.
    Learn querying SQL Server here:
    http://hodentekmsss.blogspot.com/2014/12/learn-querying-sql-server-2012-using.html


    Regarding my books on Microsoft Business Intelligence

    Regarding the books

    This app (which also happens to be my first app) brings together details of my Microsoft Business Intelligence related books from 2007 to 2014 based on the numerous articles I wrote to various online forums from 1996 to 2006. The focus of all these books is really Microsoft SQL Servers and Microsoft Visual Studio programming IDE. Also the books were written so that even beginning level readers can profit a great deal so that their learning is accelerated.

    The first book on SQL Server Integration Services Using Visual Studio 2005 provides you with a basic knowledge you should have before you move on to more advanced topics. It is a step-by-step, hands-on guide that takes you directly to the Visual Studio IDE where you learn to work with projects rapidly and efficiently. You get the first hand experience of connecting to various data sources and transform them in many ways.

     
    The second book Learning SQL Server 2008 Reporting Services is ideal for beginners who want to spin-out reports from a variety of data sources and deploy them to report servers. The book is replete with step-by-step, hands-on exercises where the users can hone their skills.


    The third book Microsoft SQL Azure: Enterprise Application Development was written at the time Microsoft seriously entered the Cloud Arena. Microsoft took its flagship SQL Server Technology to the Azure Cloud. The books gives you a comprehensive knowledge of how to work with SQL Azure in the cloud from scratch to finish.


    The fourth book Microsoft Visual Studio Lightswitch Business Application Development is a jump start, step-by-step guide to take your data out of data sources and present them to the stake holders be it on desktop; the web or the Cloud. The book does not require prior knowledge of VS Lightswitch or Visual Studio.


    The fifth book Learning SQL Server Reporting Services 2012 is a revised edition and a deals with both Native and SharePoint Integrated modes of Report Servers. This covers every aspect of the first edition(second book) with lots of added material to include development in the intervening years.

     
    As the author of these Microsoft Business Intelligence related books I have great confidence in their usefulness. I would love to hear from you. Email me at: hodentek@live.com.

    Thursday, November 27, 2014

    Things you learrn hands on in my book on SSRS 2012

    With over 65 hands-on exercises
    • Install SQL Server 2012; SharePoint Server 2010; and configure Reporting Services for both native and SharePoint Integrated mode on Windows 7.
    • Install SQL Server Data Tools and author reports both local and remote. Deploy reports to report servers.
    • Develop desktop and web applications using Report Viewer Control.
    • Author different kinds of reports with the latest gadgets working with Report Builder 3.0
    • Manage access to the report server; report scheduling; report delivery; report uploads and downloads with Report Manager
    • Create Tabular Models with SQL Server Analysis Services and deploy them to SQL Server Analysis Server using SQL Server Data Tools.
    • Author Power View Reports from your SharePoint Site and export them as PowerPoint Files.

    Tuesday, November 25, 2014

    How to overcome error while importing the SQLPS module into Powershell?

    In the previous post you learnt how to use SQL Server PowerShell Provider using the SQLPS.exe on your computer.

    You could also run the SQL Server PowerShell Provider by importing the SQLPS module into PowerShell. It may produce the following error as shown:
    --------------------
    PS C:\Windows\system32> Import-Module “sqlps” -DisableNameChecking

    WARNING: Could not obtain SQL Server Service information. An attempt to connect to WMI on 'Microsoft.WindowsAzure.Commands.SqlDatabase.Types.ps1xml' fa

    iled with the following error: The RPC server is unavailable. (Exception from HRESULT: 0x800706BA)

    WARNING: Could not obtain SQL Server Service information. An attempt to connect to WMI on 'Microsoft.WindowsAzure.Commands.SqlDatabase.Types.ps1xml' fa

    iled with the following error: The RPC server is unavailable. (Exception from HRESULT: 0x800706BA)

    WARNING: Could not obtain SQL Server Service information. An attempt to connect to WMI on 'Microsoft.WindowsAzure.Commands.SqlDatabase.Types.ps1xml' fa

    iled with the following error: The RPC server is unavailable. (Exception from HRESULT: 0x800706BA)

    WARNING: Could not obtain SQL Server Service information. An attempt to connect to WMI on 'Microsoft.WindowsAzure.Commands.SqlDatabase.Types.ps1xml' fa

    iled with the following error: The RPC server is unavailable. (Exception from HRESULT: 0x800706BA)

    WARNING: Could not obtain SQL Server Service information. An attempt to connect to WMI on 'Microsoft.WindowsAzure.Commands.SqlDatabase.Types.ps1xml' fa

    iled with the following error: The RPC server is unavailable. (Exception from HRESULT: 0x800706BA)

    WARNING: Could not obtain SQL Server Service information. An attempt to connect to WMI on 'Microsoft.WindowsAzure.Commands.SqlDatabase.dll' failed with

    the following error: The RPC server is unavailable. (Exception from HRESULT: 0x800706BA)

    WARNING: Could not obtain SQL Server Service information. An attempt to connect to WMI on 'Microsoft.WindowsAzure.Commands.SqlDatabase.dll' failed with

    the following error: The RPC server is unavailable. (Exception from HRESULT: 0x800706BA)

    WARNING: Could not obtain SQL Server Service information. An attempt to connect to WMI on 'Microsoft.WindowsAzure.Commands.SqlDatabase.dll' failed with

    the following error: The RPC server is unavailable. (Exception from HRESULT: 0x800706BA)

    WARNING: Could not obtain SQL Server Service information. An attempt to connect to WMI on 'Microsoft.WindowsAzure.Commands.SqlDatabase.dll' failed with

    the following error: The RPC server is unavailable. (Exception from HRESULT: 0x800706BA)

    WARNING: Could not obtain SQL Server Service information. An attempt to connect to WMI on 'Microsoft.WindowsAzure.Commands.SqlDatabase.dll' failed with

    the following error: The RPC server is unavailable. (Exception from HRESULT: 0x800706BA)
     
    Now how do you overcome this error.

    The error is telling that the RPC server is unavailable. However you would notice that this service is started automatically on your machine and in fact there is no Start/Stop for this service.


    However you notice that the RPCLocator service is manual and it can be started and stopped. Start this service as shown.


    Now Import the module again from PowerShell prompt as shown in the next listing:
     
    PS SQLSERVER:\> Import-Module “sqlps” -DisableNameChecking
    PS SQLSERVER:\>

    As you can see the exception is not raised.
    Now you can happily look at the SQL Server as shown:
     
    PS SQLSERVER:\> cd SQL
    PS SQLSERVER:\SQL> dir

    MachineName
    -----------
    HODENTEK8

    PS SQLSERVER:\SQL> cd LocalHost
    PS SQLSERVER:\SQL\LocalHost> dir
    Instance Name
    -------------
    REGENCYPARK

    Monday, November 24, 2014

    Accessing SQL Server via SMO using PowerShell - A quick workout

    In order to understand SQL Server the surest way is to get to understand the SQL Server Management Objects known by its acronym 'SMO'. You can programmatically access and manage SQL Servers with this object model.

    I have described with code listing as to how you may access Azure SQL Database in my comprehensive Azure SQL Database related book.
    "A step-by-step procedure to connect to SQL Azure using SMO" is described on page 119, Chapter 3 of this book.
    Microsoft SQL Azure: Enterprise Application Development, Packt Publishing,  Dec 2010.


    SMO is the foundation using which the SSMS was built. The name space for the SMO is Microsoft.SqlServer.SMO.

    In a previous post, I showed you how to run PowerShell in SQL Server Management Studio. Here is a quick screen shot to refresh your memory.

    As you can imagine the SMO object model is quite large and starts off with the Server at the top. This image shows only a part of this object model.


    You should be able to access the complete model at this link:
    http://msdn.microsoft.com/en-us/library/ms162209.aspx

    In order to access SMO using PowerShell you need to load the assembly as shown in the next image.


    With the following you can get all the members as shown.

    Once you do that you can access the top-level object, the Server.

    SMO is object based and hierarchical. You define the SQL Server as a new object using the next listing where "servername" is your computer or the server and instance name is the SQL Server instance. In the present listing it is "Hodentek\RegencyPark"
    -----------
    PS C:\Users\Jayaram> $sqlServer = new-object ("Microsoft.SqlServer.Management.Smo.Server") "Hodentek8\RegencyPark"

    Since you defined  the server, you can find its version as shown in the following listing:
    ----
    PS C:\Users\Jayaram> $sqlServer.version
    Major  Minor  Build  Revision
    -----  -----  -----  --------
    11     0      2218   -1


    ---------------
    The next two lines of code finds the status of the server as well as the root directory of the instance. 
    -------------
    PS C:\Users\Jayaram> $sqlserver.status
    Online
    PS C:\Users\Jayaram> $sqlserver.RootDirectory
    c:\Program Files\Microsoft SQL Server\MSSQL11.REGENCYPARK\MSSQL
    ----------
    Accessing the databases:

    Databases are also objects and you need declare a variable for them as shown here:
    ----
    PS C:\Users\Jayaram> $sqlDatabase=$sqlServer.Databases
    ----
    The above declaration will not display a response but you have indeed declared the variable $sqlDatabase
    Since there are more than one database, you need to get information from this collection as shown in the next listing:
    -------------
    PS C:\Users\Jayaram> foreach($sqlDatabse in $sqlServer.Databases){$sqlDatabase.name}
    AdventureWorks2012
    master
    model
    msdb
    ReportServer$REGENCYPARK
    ReportServer$REGENCYPARKTempDB
    tempdb


    These are the databases in my SQL Server Instance named RegencyPark.


    In a future post we will see how to query database and other tasks


    Wednesday, November 12, 2014

    A quick note on writing PowerShell scripts -Part 2

    In Part 2 we will script a PowerShell file and execute it. It is a very simple example. However there are a few preliminary things you should be aware of.

    Launch Windows PowerShell in Windows 8.1

    Launching Windows PowerShell in Windows 8.1 is easy. Windows 8.1 comes with PowerShell. Click the Search charm and type in 'Windows PowerShell' or, in the all apps, pick Windows PowerShell and click.

    The Windows host launches the Windows PowerShell as shown.


    You type in the command $PSVersionTable.psversion to get the version on your computer as shown. It will be probably version 4.0.
    ------------
     
    Now let us create a file, a simple one and save it with the extension ps1. I will show you later what this file look like.

    However to run a script file you need to know about the execution policy. You can get a good handle on this here:
    http://technet.microsoft.com/library/hh847748.aspx

    How do you know what policy is in force?
    To see the policy in force, just type the commandlet Get-Policy as shown and you get an immediate answer.
    ====
    PS C:\Users\Jayaram\Desktop> Get-ExecutionPolicy
    Restricted
    PS C:\Users\Jayaram\Desktop>
    ======
    'Restricted' is the default policy in Window 8, Windows 8.1 and Windows Server 2012

    What does 'Restricted' mean to you?
                - Permits individual commands, but will not run
                  scripts.
                - Prevents running of all script files, including
                  formatting and configuration files (.ps1xml), module
                  script files (.psm1), and Windows PowerShell
                  profiles (.ps1). 

    Well, you see with 'Restricted' policy enforced, you cannot run a script file (I created one called Hello.ps1 and tried to run with default policy). Actually Power Shell tells you this, if you try to run one as shown,
    =====
    .\Hello.ps1 : File C:\Users\Jayaram\DEsktop\Hello.ps1 cannot be loaded because running scripts is disabled on this
    system. For more information, see about_Execution_Policies at http://go.microsoft.com/fwlink/?LinkID=135170.
    At line:1 char:1
    + .\Hello.ps1
    + ~~~~~~~~~~~
        + CategoryInfo          : SecurityError: (:) [], PSSecurityException
        + FullyQualifiedErrorId : UnauthorizedAccess
    ====
    OK. How do you change this policy?

    Well, you need the policy changed to 'Remote signed'.
    What does 'Remote Signed' mean to you?
    It means,
    - Scripts can run. This is the default execution
                  policy in Windows Server 2012 R2.
                - Requires a digital signature from a trusted
                  publisher on scripts and configuration files that
                  are downloaded from the Internet (including
                  e-mail and instant messaging programs).
              - Does not require digital signatures on scripts that
                  you have written on the local computer (not
                  downloaded from the Internet).
                - Runs scripts that are downloaded from the Internet
                  and not signed, if the scripts are unblocked, such
                  as by using the Unblock-File cmdlet.
                - Risks running unsigned scripts from sources other
                  than the Internet and signed, but malicious, scripts.

    How do we change the execution policy?
    Well, Power Shell has this "Set-ExecutionPolicy" command. The syntax is:

    Set-ExecutionPolicy -ExecutionPolicy RemoteSigned

    There is one more thing you need to take care of before you change the policy and that is, you should run the command with elevated permissions (you should run the script as an Administrator of the local machine). If you do not ,you will get this exception:
    ================
    PS C:\Users\Jayaram\DEsktop> Set-ExecutionPolicy -ExecutionPolicy RemoteSigned
    Execution Policy Change
    The execution policy helps protect you from scripts that you do not trust. Changing the execution policy might expose
    you to the security risks described in the about_Execution_Policies help topic at
    http://go.microsoft.com/fwlink/?LinkID=135170. Do you want to change the execution policy?
    [Y] Yes  [N] No  [S] Suspend  [?] Help (default is "Y"): y
    Set-ExecutionPolicy : Access to the registry key
    'HKEY_LOCAL_MACHINE\SOFTWARE\Microsoft\PowerShell\1\ShellIds\Microsoft.PowerShell' is denied. To change the execution
    policy for the default (LocalMachine) scope, start Windows PowerShell with the "Run as administrator" option. To
    change the execution policy for the current user, run "Set-ExecutionPolicy -Scope CurrentUser".
    At line:1 char:1
    + Set-ExecutionPolicy -ExecutionPolicy RemoteSigned
    + ~~~~~~~~~~~~~~~~~~~~~~~~~~~~~~~~~~~~~~~~~~~~~~~~~
        + CategoryInfo          : PermissionDenied: (:) [Set-ExecutionPolicy], UnauthorizedAccessException
        + FullyQualifiedErrorId : System.UnauthorizedAccessException,Microsoft.PowerShell.Commands.SetExecutionPolicyComma
       nd
    ===============================
    After launching Windows PowerShell as an administrator you will have more powers.

    The following code listing shows how to run the command.
    ====
    PS C:\Windows\system32> Set-ExecutionPolicy -Scope CurrentUser
    cmdlet Set-ExecutionPolicy at command pipeline position 1
    Supply values for the following parameters:
    ExecutionPolicy: RemoteSigned

    PS C:\Windows\system32>
    ==========================
    After you type in RemoteSigned and return, you get a message from the ExecutionPolicyChange as follows:
    "The execution policy helps protect you fromscripts that you do not trust. Changing the execution policy might expose you to security risks described in the about_Execution_Policies help topic at http://go.microsoft.com/fwlink/?LinkID=135170. Do you want to change the execution policy? with three ptions, yes,no and suspend.
    Click Yes.
    You will not get a message that the policy has been changed but it will have changed.
    ========
    Now we run the file as shown in the next listing.
    =========
    PS C:\windows\system32> C:\Users\Jayaram\Desktop\Hello.ps1
    Hello World
    PS C:\windows\system32>
    ================
    Finally what was the content of the 'Hello.ps1'?

    It is the 'Hello World' example and the file has only the following content with just two lines typed into Notepad and saved to Desktop as 'Hello.ps1':
    ============
    $StringToPrint="Hello World"
    Write-output $StringToPrint


    A quick note on writing PowerShell scripts - Part 1

    PowerShell scripts are a sequence of PowerShell commands written one after another (executed in that order) using a text editor such as Notepad. The extension of a PowerShell script file is <filename>.ps1. The 1 ins ps1 has nothing to do with the version of PowerShell on your computer and you may have more than one in
    your computer,
     http://hodentekhelp.blogspot.com/2014/08/can-multiple-versions-of-powershell-can.html

    You also have the option of choosing which version you want to run
    (http://hodentekhelp.blogspot.com/2014/08/if-you-have-multiple-versions-of-power.html).

    In addition to Notepad there are other dedicated script editors like,
    and many others. For a complete listing follow this link:

    In order to run a PowerShell script file you need to create a file with extension ps1 and then run
    this script in Windows PowerShell or a similar programme.

    In Part 2 you will learn writing a simple script file.

    Monday, November 10, 2014

    SQL Server Driver for PHP released

    SQL Server driver (SQLServer31.exe, 499KB, version 3.1.CTP) for PHP is now available as a CTP. Now PHP scripts can access Microsoft SQL Server and Microsoft Azure SQL Database.

    You can download the CTP here:
    http://www.microsoft.com/en-us/download/details.aspx?id=20098&WT.mc_id=Blog_SQL_Announce_DI

    Details of this version:
    • This version supports PHP Version 5.5 and requires Microsoft ODBC driver 11 (or higher)
    • It supports SQL Server 2012; localDB abd AlwaysOn features
    • Buffered Queries are included
    All SQL Server user can get it at no extra cost.

    This widens the interoperability range.
    The soon to be released JDBC driver compatible with JDK7 for SQL Server will enable applications to connect to SQL Server widening connectivity with the Java Platform.

    Saturday, August 30, 2014

    How do you use SQL Server PowerShell provider?

    The following post looks at SQL Server 2012 instance on a Windows 8 Professional Computer.

    SQL Server PowerShell provider enables you easily and interactively look at all objects much like you look at all the objects in a folder/file system.  You can use the command line to traverse paths in a SQL Server.

    The server objects available as folders when you use Windows Power Shell are:
    SQL
    SQL Policy
    SQL Registration
    Utility
    DAC
    Data Collection
    SQL Server Integration Services
    SQL Server Analysis Services


    In order to acces objects on SQL Server you need to run SQLPS.exe which you find in the following directory:
    ---------------------------------------------
    C:\Program Files (x86)\Microsoft SQL Server\110\Tools\PowerShell\Modules>dir
     Volume in drive C is TI10672700E
     Volume Serial Number is 16FB-D230

     Directory of C:\Program Files (x86)\Microsoft SQL Server\110\Tools\PowerShell\M
    odules

     
    07/06/2014  06:33 PM    <DIR>          .
    07/06/2014  06:33 PM    <DIR>          ..
    07/06/2014  06:37 PM    <DIR>          SQLASCMDLETS
    07/06/2014  06:40 PM    <DIR>          SQLPS
                   0 File(s)              0 bytes
                   4 Dir(s)  880,764,026,880 bytes free

    ----------------------
    When you run SQLPS by double-clicking the file you spawn a new scripting shell 

    ------------
    Microsoft SQL Server PowerShell
    Version 11.0.2100.60
    Microsoft Corp. All rights reserved.

    which you can use with SQL Server as shown:
    PS SQLSERVER:\>
    --------------
    In this shell you can access the previously mentioned SQL Objects much like you would acces folders/files using you DOS commands as shown here.
    ---------------
    PS SQLSERVER:\> cd SQL
    PS SQLSERVER:\SQL> cd..
    PS SQLSERVER:\> cd SQLPolicy
    PS SQLSERVER:\SQLPolicy> cd..
    PS SQLSERVER:\> cd SQLRegistration
    PS SQLSERVER:\SQLRegistration> cd..
    PS SQLSERVER:\> cd Utility


    How do we access the Server databases?
    In order to do this you have to know the SQL Server Instance(s) and then the objects can be accessed as shown here:
    -------
    Get the instance name:
    --------------------------
    PS SQLSERVER:\> cd SQL
    PS SQLSERVER:\SQL> dir

    MachineName
    -----------
    HODENTEK8
    localhost


    PS SQLSERVER:\SQL> cd LocalHost
    PS SQLSERVER:\SQL\LocalHost> dir
    Instance Name
    -------------
    REGENCYPARK
    ------------------------------
    Let us say we want all the objects on the AdventureWorks 2012 database on this instance.
    You can find them as shown here:
    --------------
    PS SQLSERVER:\SQL\LocalHost\RegencyPark\Databases\AdventureWorks2012>
    ApplicationRoles
    Assemblies
    AsymmetricKeys
    Certificates
    DatabaseAuditSpecifications
    Defaults
    ExtendedProperties
    ExtendedStoredProcedures
    Federations
    FileGroups
    FullTextCatalogs
    FullTextStopLists
    LogFiles
    PartitionFunctions
    PartitionSchemes
    PlanGuides
    Roles
    Rules
    Schemas
    SearchPropertyLists
    Sequences
    ServiceBroker
    StoredProcedures
    SymmetricKeys
    Synonyms
    Tables
    Triggers
    UserDefinedAggregates
    UserDefinedDataTypes
    UserDefinedFunctions
    UserDefinedTableTypes
    UserDefinedTypes
    Users
    Views
    XmlSchemaCollections

    That's all for now.

    Mahalo

    Accessing PowerShell in SSMS go here:
    http://hodentekmsss.blogspot.com/2014/04/starting-power-shell-from-sql-server.html

    Lower prices with enhanced SLAs for Azure SQL Databases in September

    Another name is price war and the battle is on going on all fronts. There has been news on the
    internet regarding Microsoft's pricewar with Amazon and Google vis-a vis its cloud offerings.
    http://www.informationweek.com/cloud/infrastructure-
    as-a-service/microsoft-battles-google-amazon-in-
    cloud-price-war/d/d-id/1141625

    Although Cloud business (the thriving one) is only a small part of Microsoft right now it makes sense to make it invincible.

    http://www.citeworld.com/article/2456966/business-money/microsofts-cloud-business-is-on-fire.html

    Old prices and service tiers here:
    http://hodentek.blogspot.com/2014/05/microsoft-azure-sql-database-service.html

    Come September the price for Azure SQL Databases will be  slashed.
    Reduced pricing and enhanced SLA available in September. Read here:
    http://azure.microsoft.com/blog/2014/08/26/new-azure-sql-database-service-tiers-generally-available-in-september-with-reduced-pricing-and-enhanced-sla/

    The new pricing is as in the following image from the above site:

    Note that a new S0(S-Zero) performance level has been added in the Standard tier meant for lower-cost entry point.

    Sunday, August 24, 2014

    SQLDiag on Windows 8.1 Professional

    SQLDiag utility collects diagnostics information from SQL Server(s) including System information. This utility was run against a SQL Server 2012 Developers edition on a Windows 8.1 Professional OS. It is available in all versions starting from SQL Server 2005 to SQL Server 2014.

    SQLDIAG collects the following types of information:

    •Windows Event Logs (Application, System, and Security) in .CSV files

    •System Monitor (aka Perfmon) performance counters in .BLG file/s

    •SQL Server Profiler traces in .TRC file/s

    •SQL Server Blocking chains in a _BLK.TRC file

    •SQL Server error logs, configuration, point-in-time snapshots of several DMVs in
    a .OUT file

    •System information via the Msinfo32 utility in a .TXT file
    You can customize the utility by editing (manually)  the XML configuration file
    of the utility, SQLDiag.xml
    There is also a GUI tool which you can use to visually edit the xml file at the
    codeplex site here.
    http://sdct.codeplex.com/

    File location on your computer:
    If you have installed SQL Server in the present post SQL Server 2012 it should be
    installed in the same directory as SQL Server which is usually,
    %ProgramFiles%\Microsoft SQL Server\110\Tools\Binn
    Running it in console:
    Open the command CMD preferably in Runas Administrator mode. Change the directory
    to the one menitoned above.
    ------------
    Microsoft Windows [Version 6.3.9600]
    (c) 2013 Microsoft Corporation. All rights reserved.
    C:\Users\Jayaram>cd %ProgramFiles%\Microsoft SQL Server\110\Tools\Binn
    C:\Program Files\Microsoft SQL Server\110\Tools\Binn>
    ---------------
    Now type SQLDiag /? to get the help on SQLDiag Utility
    -------------
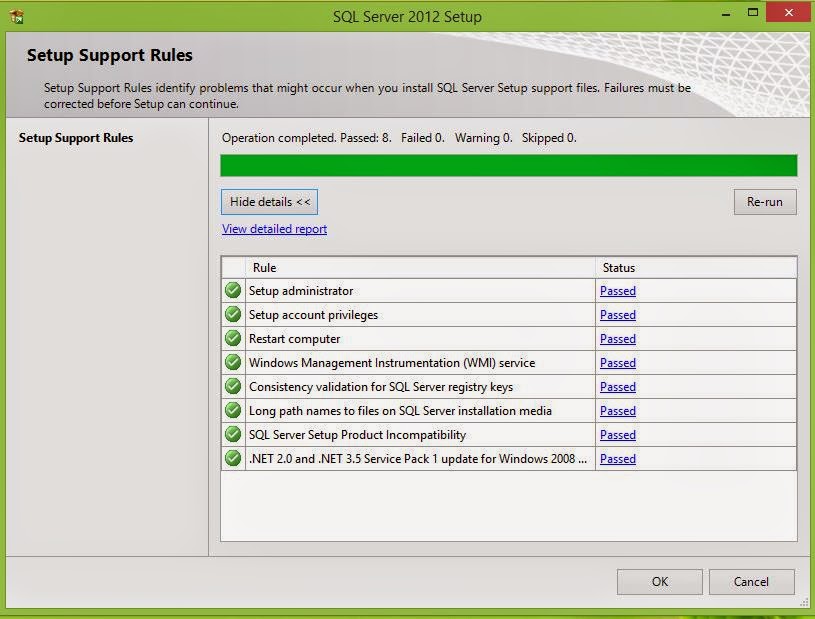
    Oops! on Windows 8.1 Professional instead of showing the help for this item, it
    goes to User Access Control and if you choose to run it, the executbale is run as shown. Probably this is a bug.
    Let us take up that problem later. The following console message is received  when the program starts:
    2014/08/22 17:27:00.62 SQLDIAG Command line parameter C:\Program Files\Microsoft SQL Server\110\Tools\Binn\SQLdiag.exe
    2014/08/22 17:27:00.62 SQLDIAG Collector version 
    2014/08/22 17:27:00.62 SQLDIAG
    IMPORTANT:  Please wait until you see "Collection started" before attempting to reproduce your issue
    2014/08/22 17:27:00.63 SQLDIAG Output path: C:\Program Files\Microsoft SQL Server\110\Tools\Binn\SQLDIAG\
    2014/08/22 17:27:00.83 SQLDIAG Error opening registry key  Software\Microsoft\Microsoft SQL Server\Instance Names\SQL\MSSQLServer. Function result: 2. Message: The system cannot find the file specified.
    2014/08/22 17:27:00.84 SQLDIAG Error opening Software key . Function result: 2. Message: The system cannot find the file specified.
    2014/08/22 17:27:00.84 SQLDIAG Error opening registry key  Software\Microsoft\Microsoft SQL Server\Instance Names\OLAP\MSSQLServer. Function result: 2. Message: The system cannot find the file specified.
    2014/08/22 17:27:00.84 SQLDIAG Error opening Software key . Function result: 2. Message: The system cannot find the file specified.
    2014/08/22 17:27:00.84 SQLDIAG Error opening registry key  Software\Microsoft\Microsoft SQL Server\Instance Names\RS\MSSQLServer. Function result: 2. Message: The system cannot find the file specified.
    2014/08/22 17:27:00.84 SQLDIAG Error opening Software key . Function result: 2. Message: The system cannot find the file specified.
    2014/08/22 17:27:00.84 SQLDIAG Failed to open Software\Microsoft\MSSQLServer key . Function result: 2. Message: The system cannot find the file specified.
    2014/08/22 17:27:00.84 SQLDIAG Failed to open Software\Microsoft\MSSQLServer key . Function result: 2. Message: The system cannot find the file specified.
    2014/08/22 17:27:00.84 SQLDIAG Failed to open Software\Microsoft\Microsoft SQL Server\MSSQL11.REGENCYPARK key . Function result: 2. Message: The system cannot find the file specified.
    2014/08/22 17:27:00.84 SQLDIAG Collecting from 1 logical machine(s)
    2014/08/22 17:27:00.84 SQLDIAG Error opening registry key  Software\Microsoft\Microsoft SQL Server\Instance Names\SQL\MSSQLServer. Function result: 2. Message: The system cannot find the file specified.
    2014/08/22 17:27:00.84 SQLDIAG Error opening Software key . Function result: 2. Message: The system cannot find the file specified.
    2014/08/22 17:27:00.84 SQLDIAG Error opening registry key  Software\Microsoft\Microsoft SQL Server\Instance Names\OLAP\MSSQLServer. Function result: 2. Message: The system cannot find the file specified.
    2014/08/22 17:27:00.84 SQLDIAG Error opening Software key . Function result: 2. Message: The system cannot find the file specified.
    2014/08/22 17:27:00.84 SQLDIAG Error opening registry key  Software\Microsoft\Microsoft SQL Server\Instance Names\RS\MSSQLServer. Function result: 2. Message: The system cannot find the file specified.
    2014/08/22 17:27:00.84 SQLDIAG Error opening Software key . Function result: 2. Message: The system cannot find the file specified.
    2014/08/22 17:27:00.84 SQLDIAG Failed to open Software\Microsoft\MSSQLServer key . Function result: 2. Message: The system cannot find the file specified.
    2014/08/22 17:27:00.84 SQLDIAG Failed to open Software\Microsoft\MSSQLServer key . Function result: 2. Message: The system cannot find the file specified.
    2014/08/22 17:27:00.84 SQLDIAG Failed to open Software\Microsoft\Microsoft SQL Server\MSSQL11.REGENCYPARK key . Function result: 2. Message: The system cannot find the file specified.
    2014/08/22 17:27:00.85 <computername>\* Instances registry value not found (you can usually safely ignore this) . Function result: 2. Message: The system cannot find the file specified.
    2014/08/22 17:27:00.85 <computername>\* Instances registry value not found (you can usually safely ignore this) . Function result: 259. Message: No more data is available.
    2014/08/22 17:27:00.87 <computername>\* Instances registry value not found (you can usually safely ignore this) . Function result: 259. Message: No more data is available.
    2014/08/22 17:27:00.87 <computername>\* Error opening MSSQLSERVER key . Function result: 2. Message: The system cannot find the file specified.
    2014/08/22 17:27:00.87 <computername>\* Instances registry value not found (you can usually safely ignore this) . Function result: 259. Message: No more data is available.
    2014/08/22 17:27:00.87 <computername>\* SQL Server version: 11
    2014/08/22 17:27:00.88 <computername>\* Machine name: <computername> (this machine) 
    2014/08/22 17:27:00.88 <computername>\* Target machine is not a cluster
    2014/08/22 17:27:00.88 <computername>\* Instance: REGENCYPARK (64-bit)
    2014/08/22 17:27:10.85 SQLDIAG Initialization starting...
    2014/08/22 17:27:28.76 <computername>\* MsInfo: Get MSINFO32
    2014/08/22 17:27:32.58 <computername>\* MsInfo: Get default traces
    2014/08/22 17:27:36.72 <computername>\* MsInfo: Get SQLDumper log
    2014/08/22 17:27:41.89 SQLDIAG Initialization complete
    2014/08/22 17:27:41.89 <computername>\* Collecting diagnostic data
    2014/08/22 17:27:42.89 SQLDIAG Collection started.  Press Ctrl+C to stop.
    2014/08/23 20:34:00.35 SQLDIAG Ctrl+C pressed.  Shutting down the collector
    2014/08/23 20:34:03.16 <computername>\* Shutting down the collector
    2014/08/23 20:34:03.20 <computername>\* Getting SQLConfig report(s)
    2014/08/23 20:34:30.15 SQLDIAG Ending data collection.  Please wait while the process shuts down and files are compressed (this may take several minutes)
    In this case the collection was terminated and it can quite a long time.
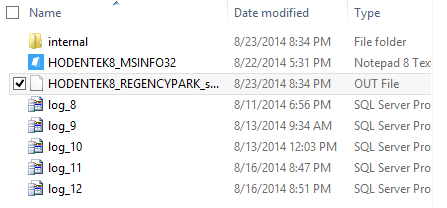
    The results are written to files found in the SQLDiag folder
    C:\Users\Jayaram>%Program Files%\Microsoft SQL Server\110\Tools\Binn\SQLDiag


    Tuesday, July 22, 2014

    July 2014 Update to SQL Server Data Tools

    Latest release of SQL Server Data Tools(SSDT) is now available here:

    http://msdn.microsoft.com/en-us/data/hh297027

    This update is now available for Visual Studio 2012 and 2013

    Instead of the above link you can also get it from inside Visual Stuido 2012 via Tools -> Extensions and Updates->Updates.

    What's new in this:
    Of course more bug fixes and some of the following enhancements:
    • Schema Compare update
             Added MSBuild support for Schema Compare with text and XML output.  A blog post is    available with more information.
    • Improved Windows Azure SQL Database node in the Server Explorer
            Added Token-based authentication using a Microsoft account (MSA) or organizational account (OrgId)
            Added supported for VS2012
    • Improved (Parallel Data Warehouse) PDW support
           PDW tooling is now part of the Microsoft Visual Studio Express 2013 for Windows Desktop SKU.  This requires the VS 2013 Update 2 or later to be installed
          Support for PDW appliance updates in both VS2012 and VS2013

    Also read:
    http://brianwmitchell.com/2013/11/sql-server-to-pdw-migration-whitepaper/

    SSDT for SQL Server 2014 here:
    http://hodentek.blogspot.com/2014/03/sql-server-data-tools-to-go-with-sql.html

    SSDT BI_Templates here:
    http://hodentek.blogspot.com/2013/10/ssdt-bi-templates-for-sql-server-2012.html

    SSDT Web Site:
    http://msdn.microsoft.com/en-us/data/tools.aspx

    Monday, July 14, 2014

    SQL Server 2012 Developer Edition: Part 1 Installation

    You could get to install a free version of SQL Server Express 2012 without an expiry date but it is not like using all the features available in a Enterprise edition. You could get a few more things in SQL Server 2012 if you install the Express edition with Advanced features. You may also get a Enterprise edition for free, but it is limited for 120 days. What do you do after 120 days, put your system clock back?

    The better choice is SQL Server 2012 Developer edition and it has all the features of an Enterprise edition. The downside is you will have to pay for it. It can cost anywhere from $30 to $60 depending on the source. I have had problems with the evaluation editions before and I decided to go for Developer edition.

    Some details are here as to where you can download:
    http://hodentek.blogspot.com/2014/07/developer-editions-are-better-choice.html

    It is also a good training software for a group of say, unemployed folks looking to find a job in the area of SQL Servers. They could buy a developer edition (and each member installing the express edition on his/her laptop/desktop) and use it is a group sharing cost and getting very good (on-the job) training working as a group; checking out features that are available, etc. According to Microsoft the full feature set is available in the Developer edition, except that you cannot use it in production.

     I have described the installation steps many times and one as recently as this:
    http://hodentek.blogspot.com/2012/05/sql-server-express-2012-and-localdb.html

    I will only make brief remarks for some of the screen shots. The installation is described in great detail in my two books, the first one with SQL Server 2008 and the second with SQL Server 2012.

             
    SSRS 2008                                                                                                                     
     
    Here I started off with a CD that I purchased from Microsoft Store. The installation was on a Toshiba Laptop computer with Windows 8.1 Professional OS with enough memory. 
    As soon as the CD is ready either open the setup.exe or just let it auto play. The first screen you get is the SQL Server Installation Center. Here on the right you can access a lot of information and if it is the first time click on the links and read as much as possible, especially the hardware and software requirements. This is the planning navigation link you find on the left of the screen


    Click on the New Installation.. on the right. You will be installing a new named instance of SQL Server.
    After some processing you will get the Setup Support Rules page where the checks are made. If you do no succeed you may have to full fill the requirements and try again. When it passes all tests you get a screen as shown.
     
     
    Click OK. Enter the Product Key and click Next>.


    Accept the License  terms (2 check marks ) and click Next


    At this point if there are updates they can be downloaded (assumes you are connected to the Internet ) and installed (after you click Next>).

     
     The following is the link to KB Article of the download.

     
    Read the notes on this page. The setup rules will be checked. Correct them if necessary and click Next>.

     
     If you click on thee link, for example the one or Windows Firewall you get a message as shown.


    In the displayed page you will choose a role for the installation. Choose the option (SQL Server Feature Installation)  shown in the next screen.
     
     
    Click Next to display the Feature Selection page shown here. Here all features have been selected. If you click on nay of them, description of what it is, is displayed on the right and the requisites are also shown.


    Click Next. Installation rules will be checked as shown. You may consider these as requirements for the installation. If it is lacking you should correct and try again.


    Click Next. In the Instance Configuration page you can either create a Named Instance or a Default Instance. For a named instance you can provide your own name. Herein RegencyPark. Some of the text-boxes gets auto filled.

     
    If you had had a previous instance it will show-up in the Installed Instances box. Click Next to find if you have enough resources to install in terms of disk space.


    Click Next>. You will have to set up the Server configuration for the various components. Microsoft recommends a separate user/login. However, it is best to use the same account/password for all on a single machine which is going to be used by one or two persons. Moreover such caution is not necessary as it is not a production server.

     
    In this installation the Windows Administrator (who happens to be the Current User) will administer the SQL Server. His user name/password is registered in the computer. You will be better off hitting the <browse..> button to get to the screens shown here to indicate the Window Login is the current user for all the serer components. Hitting Advanced button brings up the screen on the right. Hit on Find Now and get the drop-down shown where you can select.

     
    The Selected User gets added and updates the screen as shown.

     
    Click OK

     
    You may have to do this procedure for each of the component that needs username/password. When all of them are set up with username/password click the Collation tab and accept the default.


    Click Next to display the Database Engine Configuration page. It has three tabs. In the Server Configuration you need to make the choice of the administrator. Choose Windows Authentication (you could also use the other option, herein the Windows Authentication is chosen). Click Add Current User and the Windows Administrator will be added. You could also add others if they have Windows Login accounts for the computer. You can also remove an existing one. Since this is the first time, only one user is added.

     
    In the Data Directories tabbed page you will see the location of various files and you could change the default locations using the ellipsis buttons on this page.
     
     
    In the next tabbed page make changes as shown for File Stream.

     
    Click Next>. You will added the same administrator for Analysis Services similar to what you carried out earlier. Clicking on Add Current User will suffice. There are two modes from which you need to choose one. Herein the Multidimensional and Data Mining Mode is chosen. The SQL Server 2012 Reporting Services book describes in detail these modes of Analysis Services.

     
    The Data Directories tabbed page show where the files are stored and they can be changed as well if necessary.


    Click Next. brings you to the Reporting Services configuration page. Choose the option shown. Again the different options for reporting services is described in great detail in the two books whose links were provided earlier.


    Click Next and accept the default. Add Current User.

     
    In the Distributed Replay Client page provide a name for the controller (your choice).

     
    Click Next. and accept to allow Microsoft get access to some information. This is pretty safe.

     
    Click Next. The Installation Configuration rules will be checked to make sure that there are no blocking issues.


    Click Next and you will see the various components\ sub-components that will be installed.

     
    Click Install and the Installation Progress screen is displayed. This may take quite some time and do not pull out.


    Finally you get the installation success page as shown.

     
    In Part 2: Installation verification
    

    I am not paying this invoice. I am disregarding it, becuase....

     I am not paying this invoice because MICROSOFT has not provided me with a satisfactory way to access my account since June of this year des...