Apps with database back-end are at the center of enterprise applications. Appery.io provides means to create a database as well as work with many other databases as well. Appery.io can connect to SQL Server, Azure SQL Database, Oracle etc.
In this post the procedure to create a simple database followed by adding a column and couple of columns is described. In so far as database is accessed by client using server side code, the Appery.io's interface is used to create server side code and testing it using the same interface.
In the next post we consider connecting to a SQL Database.
You can start here if you like. You may have to insert your credentials.
https://appery.io/database/
This opens the Appery.io page as shown.

ApperyIO2_0
Creating a database:
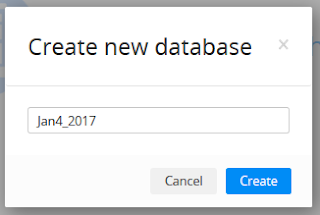
Click Create new database.
In the Create new database window provide a name such as the one shown and click Create.
 ApperyIO2_1
After a little while you should see this web page.
 ApperyIO2_2
Creating a Collection:
Jay4_2017 database data will be held in a Collection.
Click Create new collection.

ApperyIO2_3.PNG
Enter a name for the collection, say Goods and Click Add.
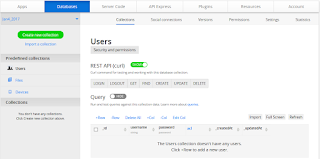
The Collection page for Goods is displayed as shown.

ApperyIO2_4.PNG
The new collection has a user interface for adding,deleting, columns, rows and editing them
Creating a Column:
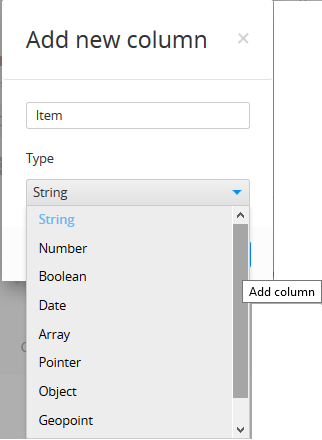
Click +Col to display the Add new column dialogue as shown.


Click Create column.
Column gets created as shown. The collection has no data but has a column named Item.
 ApperyIO2_7
Populate the column with data by adding a row:
Click +Row
 ApperyIO2_8
The pages is refreshed to show an interface to add a row. For item field insert Cold drink. Click +Row to add more columns.
 ApperyIO2_9
This is all for now. The database has one column containing 3 rows of data of type String.
The database is accessed by clients using Server Code.
This is how you create server code:
Click Server Code button to open the interface as shown.
 ApperyIO2_10
Presently there are no scripts. Click Create script button to open the following page:

ApperyIO2_11
Provide a name for the script- loadGoodsScript
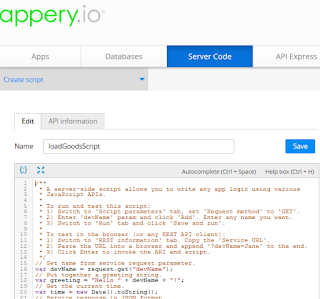 ApperyIO2_12
Click Save.
Under Snippets on the right hand side locate retrieveAllObjects as shown.

ApperyIO2_13
Click insert to insert the snippet (template code) as shown (you may have remove the existing code in the script editor).
 ApperyIO2_14
dbId and collectionName are place holders and you need to find these to provide.
Click Save.
Finding dbID:
Go to Database and click Jan4_2017 database. In the Databases page locate Settings as shown here.
 ApperyIO2_15
Click Settings.
Database settings will be open as shown.

APIKey: xXXXXXXXXXXXX


In the Server Code page click Save and Run and return. You get the following response.

ApperyIO2_18
It returns the entire collection in JSON format as shown above.
In this post the procedure to create a simple database followed by adding a column and couple of columns is described. In so far as database is accessed by client using server side code, the Appery.io's interface is used to create server side code and testing it using the same interface.
In the next post we consider connecting to a SQL Database.
You can start here if you like. You may have to insert your credentials.
https://appery.io/database/
This opens the Appery.io page as shown.

ApperyIO2_0
Creating a database:
Click Create new database.
In the Create new database window provide a name such as the one shown and click Create.

After a little while you should see this web page.

Creating a Collection:
Jay4_2017 database data will be held in a Collection.
Click Create new collection.

ApperyIO2_3.PNG
Enter a name for the collection, say Goods and Click Add.
The Collection page for Goods is displayed as shown.

ApperyIO2_4.PNG
The new collection has a user interface for adding,deleting, columns, rows and editing them
Creating a Column:
Click +Col to display the Add new column dialogue as shown.
ApperyIO2_5.PNG
For Name enter Item and keep Type as string. You can also choose any of the other available type.
ApperyIO2_6
Click Create column.
Column gets created as shown. The collection has no data but has a column named Item.

Populate the column with data by adding a row:
Click +Row

The pages is refreshed to show an interface to add a row. For item field insert Cold drink. Click +Row to add more columns.

This is all for now. The database has one column containing 3 rows of data of type String.
The database is accessed by clients using Server Code.
This is how you create server code:
Click Server Code button to open the interface as shown.

Presently there are no scripts. Click Create script button to open the following page:

ApperyIO2_11
Provide a name for the script- loadGoodsScript

Click Save.
Under Snippets on the right hand side locate retrieveAllObjects as shown.

ApperyIO2_13
Click insert to insert the snippet (template code) as shown (you may have remove the existing code in the script editor).

dbId and collectionName are place holders and you need to find these to provide.
Click Save.
Finding dbID:
Go to Database and click Jan4_2017 database. In the Databases page locate Settings as shown here.

Click Settings.
Database settings will be open as shown.

ApperyIO2_16
Read the Session expiration information.
copy the API keys APIKey: xXXXXXXXXXXXX
The loadGoodsScript should appear as shown.

ApperyIO2_17
Insert responseSuccess snippet from Snippets. The script editor should appear as shown.

ApperyIO2_17b
Click Save.
You are ready to test the database.
Testing the Collection:
In the Server Code page click Save and Run and return. You get the following response.

ApperyIO2_18
It returns the entire collection in JSON format as shown above.


No comments:
Post a Comment