Showing posts with label Azure SQL Database. Show all posts

Tuesday, January 14, 2025

Install the latest version of SQL Server Management Studio 20.2

This is the latest version of SQL Server Management Studio [build no:20.2.30.0, released July 9,2024]. Note: it is not an upgrade to SQL Server 19.x

  • SQL Server Management Studio (SSMS) is an integrated environment for managing any SQL infrastructure, from SQL Server to Azure SQL Database. 
  • SSMS provides tools to configure, monitor, and administer instances of SQL Server and databases. 
  • Use SSMS to deploy, monitor, and upgrade the data-tier components used by your applications and build queries and scripts.

You may download the executable from this link:

https://learn.microsoft.com/en-us/sql/ssms/release-notes-ssms?view=sql-server-ver16

You will find the following (SSMS-ENU) in your download:


You can doble-click the application to start installing. It takes a very short time to install as shown in these screenshots:


Click Install and installation begins.


These are some new features of the SQL Server Management Studio (from the Microsoft documentation).


Connecting to an existing SQL Server 2022:

Kindly follow the links for installing the SQL Server 2022:


If your SSMS 20.2 installation is successful you should be seeing in the Windows Control Panel  several additional components to ensure a smooth and comprehensive experience in using SQL Server Management Studio:

  • Microsoft Visual Studio Tools for Applications 2019: This is necessary for certain features within SSMS that rely on Visual Studio's development environment.
  • SSMS 20.2: The main application for managing SQL Server instances.
  • Microsoft Help Viewer: Provides access to documentation and help files within SSMS.
  • Microsoft OneDrive: This might have been included to facilitate cloud storage and synchronization of your files.
The SSMS20.2 installation also adds the launch program for the SSMS that you can find in the Search as shown here:

C:\ProgramData\Microsoft\Windows\Start Menu\Programs\Microsoft SQL Server Tools.

This folder has the following files: 

Shortcut to the SSMS 20.2 launch
Shortcut to Analysis Services Deployment Wizard 20
Performance tools folder

You can doble click to launch from this location or on the Search results:


The SSMS 20.2 above when clicked launches the application and the SSMS user interface is displayed as shown:


Although the program connects to the installed version of SQL Server it is looking for a trusted connection by way of a certificate. There is a check box below Encryption (that has three options) shown above.

If you do not check this box and try to connect you get the following exception:


If you do place a checm mark saying you trust and then connect you get the following display:


This connection is now OK and the SSMS is OPEN FOR BUSINESS!!!

If you are looking for working with databases, stay in and learn from over 15 years of blogging on databases here.  http://hodentekMSSS.blogspot.com

You may also have a look at my database related books:


Thursday, March 2, 2017

Using a Bacpac file to construct the Wide World Importers Database

In my previous post I showed you how easy it is to bring the Wide World Importers (WWI) database into a named instance of SQL Server 2016 SP1 on your computer(desktop / laptop).

In this post I describe how you may construct the database on the named instance using a BacPac file.
If you have not used this kind of file please review the following link here.

In what follows I describe using the .bacpac file to construct the WWI database
Go here:
https://github.com/Microsoft/sql-server-samples/releases/tag/wide-world-importers-v1.0

Get this bacpac file:
Azure SQL Database Standard tier

    WideWorldImporters-Standard.bacpac - standard edition OLTP sample database in bacpac format. For Azure SQL Databases in the Standard tier.


Download the 58.4 MB file from the above site.


SQL Server 2016 SP1 like the other versions has a wizard to bring the database using a .bacpac file such the one you downloaded.

You invoke the wizard as shown in the next image and follow through.


bakpacWWI_01.png

Click Import Data-tier Applicaiton... to open the window shown in the next image.  Read the steps in this introductory page.


bakpacWWI_02.png

 Click Next. You click the Browse... button to locate the  indicated file. This is the location to which I saved the WideWorldImporters-Standard.bacpac file. 
It does not matter it is for Azure SQL Database.


bakpacWWI_03.png

After getting the file location from the location as shown in the next image proceed to next step.


bakpacWWI_04.png


After getting the file location in the wizard's interface (the image one above the previous) click Next.


bakpacWWI_05.png

 Just verify that the location for files are what you want. Herein defaults are accepted. You could browse and park elsewhere.

The database name was changed to WWI_Bacpac.
 
Click Next. The Summary of processing is presented as shown.


bakpacWWI_06.png


Click Next. The next four images shows the progress captured in images. Indexes are dropped and created, etc.

 bakpacWWI_07.png
 bakpacWWI_08.png
 bakpacWWI_09.png
bakpacWWI_10.png

Object explorer refreshed - last processing step.

The WWI database is imported successfully.

Here is the final verification of the import into the named instance.

bakpacWWI_10.png

Thursday, February 23, 2017

Azure SQL Database even more secure with threat detection

This cyber security will be coming soon in April 2017 offering protection from threats in addition to more sophisticated search capabilities. If you are using Azure DocumentDB then you are compliant with the latest security measures.

Securing Azure SQL Database takes just a few minutes and requires no expert knowledge of how it is done. The feature learns profiling and discovering anomalous activities and probably with built-in AI.

This is likely to cost an extra $15/month/server according to this site here .

Read here for more.
Read some more here.

Monday, February 6, 2017

Back-end database with Appery.io - Part 1

Apps with database back-end are at the center of enterprise applications. Appery.io provides means to create a database as well as work with many other databases as well. Appery.io can connect to SQL Server, Azure SQL Database, Oracle etc.

In this post the procedure to create a simple database followed by adding a column and couple of columns is described. In so far as database is accessed by client using server side code, the Appery.io's interface is used to create server side code and testing it using the same interface.

In the next post we  consider connecting to a SQL Database.

You can start here if you like. You may have to insert your credentials.

https://appery.io/database/

This opens the Appery.io page as shown.


ApperyIO2_0

 Creating a database:

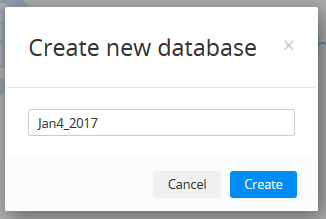
Click Create new database.
 In the Create new database window provide a name such as the one shown and click Create.

 ApperyIO2_1

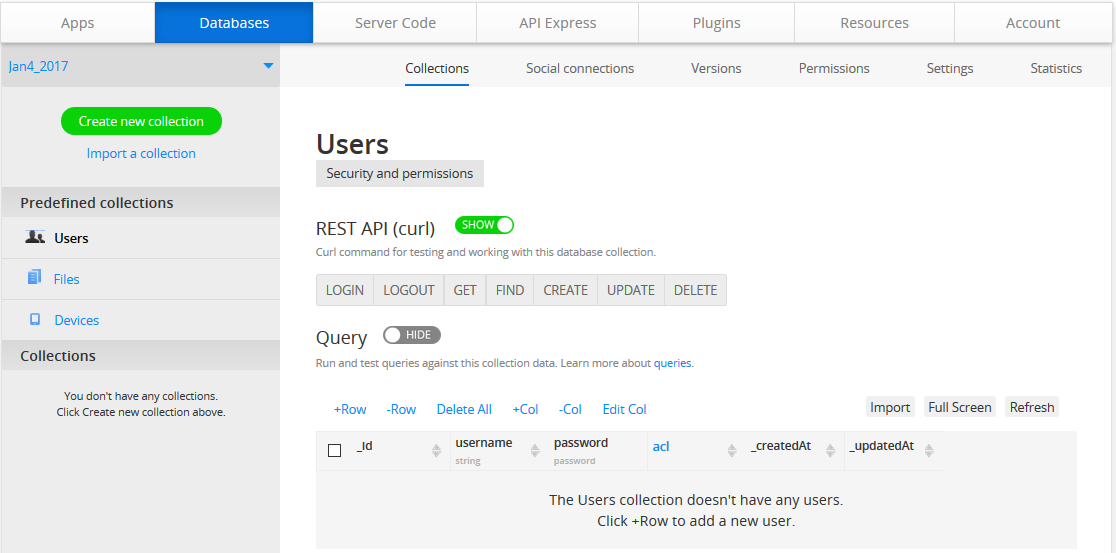
After a little while you should see this web page.

 ApperyIO2_2

Creating a Collection:
Jay4_2017 database data will be held in a Collection.
Click Create new collection.


ApperyIO2_3.PNG

Enter a name for the collection, say Goods and Click Add.

The Collection page for Goods is displayed as shown.


 ApperyIO2_4.PNG

The new collection has a user interface for adding,deleting, columns, rows and editing them

Creating a Column:

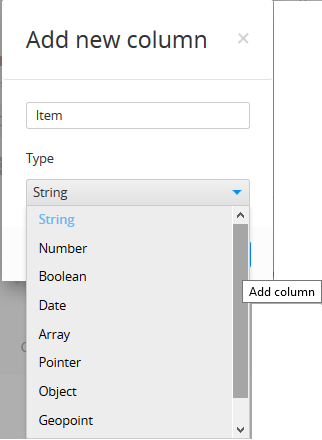
Click +Col to display the Add new column dialogue as shown.

ApperyIO2_5.PNG 

For Name enter Item and keep Type as string. You can also choose any of the other available type.

ApperyIO2_6

Click Create column.

Column gets created as shown. The collection has no data but has a column named Item.

 ApperyIO2_7

Populate the column with data by adding a row:
Click +Row 
 ApperyIO2_8

The pages is refreshed to show an interface to add a row. For item field insert Cold drink. Click +Row to add more columns.

 ApperyIO2_9

 This is all for now. The database has one column containing 3 rows of data of type String.
The database is accessed by clients using Server Code.

This is how you create server code:

Click Server Code button to open the interface as shown.

 ApperyIO2_10


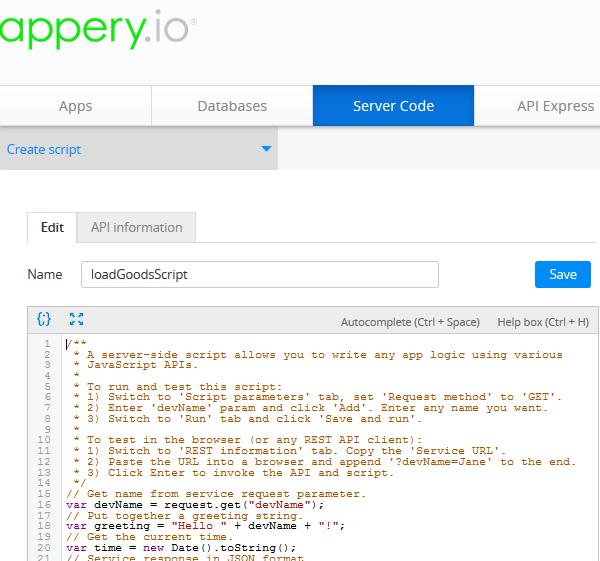
Presently there are no scripts. Click Create script button to open the following page:


 ApperyIO2_11

Provide a name for the script- loadGoodsScript

 ApperyIO2_12

Click Save.

Under Snippets on the right hand side locate retrieveAllObjects as shown.


 ApperyIO2_13

 Click insert to insert the snippet (template code) as shown (you may have remove the existing code in the script editor).

 ApperyIO2_14

dbId and collectionName are place holders and you need to find these to provide.
Click Save.

Finding dbID:

Go to Database and click Jan4_2017 database. In the Databases page locate Settings as shown here.

 ApperyIO2_15

 Click Settings.

Database settings will be open as shown.

ApperyIO2_16 

Read the Session expiration information.
copy the API keys
APIKey: xXXXXXXXXXXXX

The loadGoodsScript should appear as shown.


ApperyIO2_17 

Insert responseSuccess snippet from Snippets. The script editor should appear as shown.


 ApperyIO2_17b

Click Save.

You are ready to test the database.

Testing the Collection:

In the Server Code page click Save and Run  and return. You get the following response.


 ApperyIO2_18

It returns the entire collection in JSON format as shown above.


Sunday, May 29, 2016

SQL-Variant Data Type in SQL Servers

Introduced in SQL Server 2008 and now available in all recent versions including Azure SQL Database; sql_variant is a data type that allows a column to have other data type elements. A single column can store int,char and binary data types. It can be used not only for columns but also for parameters, variables and return values of user defined functions.

These are some of the details you should know about:
sql_variant can have a maximum length of 8016 bytes.
sql_variant data type must first be cast to its base data type before participating in operations
sql_variant can be assigned a default value. This data type can have Null but they have no associated data type.
sql_variant cannot have sql_variant

Here is an example of a query run on a table that has a column (2nd) with sql_variant data type:


Thursday, May 12, 2016

Stretch Database is a nice feature of SQL Server 2016

Source: MSFT Blog

Why do you need this?

Well you want to archive data (historical) but you do not want to store it locally as it is not frequently accessed and your resources are inadequate. However you do want to access. No problem, a query in SSMS can access that data (remotely stored in Azure) as easily as the on premises data. It is possible there may be a bit of latency from the remote site.

SSMS 2016 has a very good wizard to take care of the Stretch Database.  The Wizard is accessible via the Object Explorer. You need to select the database you want to extend using the Stretch Database feature. It is not necessary that you choose an entire database to extend; you can use the filter to include what you need to go into the Stretch database. Of course, since the remote is on Azure, you should have an account and proper credentials. The Stretch database is always online and querying should have no problem.

Stretch database is compatible with the other features; Transparent Data Encryption and Always Encrypted and Row-Level Security features.

You do require a Azure account but a free trial is available. There is a price for everything including the new Stretch database feature.

More here:
https://blogs.technet.microsoft.com/dataplatforminsider/2016/04/13/keep-data-virtually-forever-with-stretch-database-in-sql-server-2016/

Tuesday, February 9, 2016

A tutorial on creating script using SQL Server Management Studio

Creating script is an important skill that you should learn. As there are so many versions of SQL Server not to mention those on Microsoft Azure Cloud platform, you should know for which version you are writing the script. You can change this in Tools | Options and look for scripting node.

This presentation is created using Microsoft's latest presentation program SWAY. This is my first shot at SWAY. The presentation may not be smooth. Would you kindly comment? Thanks


Friday, July 31, 2015

Azure SQL Datawarehouse for RedPoint Global Campaign Management Service

RedPoint is a leading provider of Campaign Management providing data management and personalized customer engagement software that interacts across various channels using a single user interface.

Find out how RedPoint became a leader in cross-channel campaign management after giving your details here;
http://www.redpoint.net/redpoint-resources/register-the-forrester-wave-cross-channel-campaign-management-q3-2014/

For such a global service dealing with big data, Microsoft is a natural fit as RedPoint recently announced support for Azure SQL Dataware house and Azure Data Lake Service.

You can start creating a RedPoint Campaign from the Microsoft Preview portal as shown using either the default Service Management Stack or the Resource Manager Stack.


Here is a brief summary of the RedPoint capabilities as found on the preview portal:

"RedPoint’s campaign management software enables marketers to design and execute customer interactions across any channel. Users can build omni-channel campaigns and set up real-time inbound marketing strategies – all from the same, intuitive drag-and-drop interface. All these cross-channel campaign management capabilities are built into one marketing automation product, including the ability to: select and segment audiences; design multi-stage emails, triggered campaigns, landing pages, mobile or social messages; do A/B testing with just a few clicks; coordinate work and align activities with easy-to-use collaboration and asset management features; easily track, analyze and use results to improve future efforts."

Sunday, May 18, 2014

Create a Windows Azure Mobile Service and its SQL Database buddy at the same time

It is incredibly easy to add a backend to your connected client application using Windows Azure Mobile Services (WAMS).

With WAMS you can provide a secure and scalable backend to power your apps not only on Windows but many other platforms such as iOS, Android etc. Storing data and authenticating users is effortless and you can even send push notifications. As to programming languagges you can use Node.JS or C#.

There are several data storage options
as well, on-premises or Azure SQL Satabase, blob storage, table storage and MongoDB.

Steps you need to follow to create a mobile service.
To get started you should sign up and get yourself an Windows Azure account and enable Mobile Services feature on Windows Azure.

This following procedure assumes you have an account with Windows Azure.

Login to the Management Portal.

When you click on Mobile Services you will see that you have no Mobile Service


Now you will create one.

Click on CREATE A NEW MOBILE SERVICE
You want something free (I presume).  As a part of the service you will be creating a new server and a SQL Database. You can choose to create a free 20 MB SQL database. I think it is still not available at all datacenters.

If you already have a Azure SQL database you can choose that database instead of creating a new one. Here the West US region is chosen. You can have the backend language to be Javascript or .NET. Here Javascript is chosen.


Click on the arrow a the bottom right which takes you to the database settings for the NEW MOBILE SERVICE as shown.


Enter the details as shown. The SERVER LOGIN NAME and SERVER LOGIN PASSWORD are yours to choose, but passowrd has to be strong (1 number, 1 special charactr, not less than eight charactrs etc). You can place a check mark for CONFIGURE ADVANCED DATABASE SETTINGS.

 
You can go back and change settings using the arrow (appropriate ) or go to the next page of the wizard.

Your collation can also be chosen. Here the default is accepted. This is a free database but if you want to change the size or settings, you may have to pay.
\

Click on the OK icon and your mobile service is pronto as shown.


The URL is being created and it will take some time. In a relatively short time you will have established a mobile service on the Windows Azure platform and a backend SQL database to use.

Well my mobile service was up and running in no time at all.


I will be posting more on this and related topics keep watching this blog or my two other related blogs:
http://hodentekMSSS.blogspot.com
http://hodentekMobile.blogspot.com

Mahalo

Jay

When Identity Security Becomes a Wall — Not a Shield

After a breach that forced a reset of my digital identity, I hit a roadblock I never anticipated: multi-factor authentication (2FA) locked m...