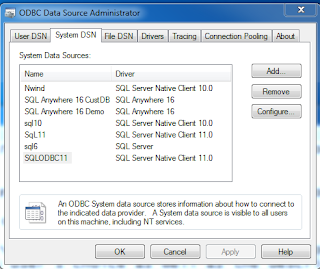
You can use the ODBC Data Source Administrator interface on your computer to create the DSN. You can display this interface from Control Panel | System and Security | Administrative Tools | Data Source (ODBC) as shown.
We will now create a System DSN.
Click System DSN and click Add. The Create New Data Source window is displayed as shown.
Click SQL Server Native Client 11.0 and click Finish.
The Create a New Data Source to SQL Server window is displayed as shown. You are supposed
to provide all the details. The Name is user's choice as well as the Description. The
drop-down for 'Which SQL Server do you want to connect to' should bring up the list of
servers accessible on your computer as shown.
Highlight HodentekWin7\NJ and click Next. HodentekWin7\NJ is a SQL Server 2012 named instance on this computer with 'mysorian' as administrator. Click Next to open the window for authentication details.
Accept the default authentication shown. Click Next to display the following.
Again accept the defaults on this page as well.
Click Finish. The ODBC Microsoft SQL Server Setup file is displayed as shown.
Click Test Data Source and verify connectivity as shown.
Click OK and Click OK. The new DSN is added to the list as shown.
Click OK and close out.
This completes the steps to create an ODBC DSN to SQL Server 2012.
We will now create a System DSN.
Click System DSN and click Add. The Create New Data Source window is displayed as shown.
Click SQL Server Native Client 11.0 and click Finish.
The Create a New Data Source to SQL Server window is displayed as shown. You are supposed
to provide all the details. The Name is user's choice as well as the Description. The
drop-down for 'Which SQL Server do you want to connect to' should bring up the list of
servers accessible on your computer as shown.
Highlight HodentekWin7\NJ and click Next. HodentekWin7\NJ is a SQL Server 2012 named instance on this computer with 'mysorian' as administrator. Click Next to open the window for authentication details.
Accept the default authentication shown. Click Next to display the following.
Accept defaults and click Next.
Again accept the defaults on this page as well.
Click Finish. The ODBC Microsoft SQL Server Setup file is displayed as shown.
Click Test Data Source and verify connectivity as shown.
Click OK and Click OK. The new DSN is added to the list as shown.
Click OK and close out.
This completes the steps to create an ODBC DSN to SQL Server 2012.


Here is new SQL Server ODBC driver which might come in handy https://www.devart.com/odbc/sqlserver/download.html
ReplyDeleteEspecially when it comes to Linux and Mac OS X
I cannot find the "Create a New Data Source to SQL Server" in Management Studio. Could you please specify how to start that wizard?
ReplyDeleteVery informative. Thanks for this post about Process server NJ.
ReplyDelete