Showing posts with label SQL Server 2012. Show all posts

Sunday, August 20, 2017

Enabling FILESTREAM on an instance of SQL Server Database Engine

You could configure FILESTREAM at installation time as shown here while configuring the Database engine for a SQL Server 2012 Express named instance.


FileStream_00

At the highlevel you need the Transact-SQL Access and if you need the file I/O access you need to enable it and provide a Windows share name as shown. If remote client access to FileSTREAM data is required you need to check this as well.

You could check whether FILESTREAM is enabled or not, by reviewing the instance properties in SQL Server Configuration Manager on the SQL Server Instance as shown for the instance OHANA.


The file share location is accessed by the UNC name as shown:


If FILESTREAM is not enabled you can enable in the Configuration Manager.

Sunday, July 16, 2017

Restoring the Northwind database from its backup

A backup of Northwind database was obtained from the Codeplex site and was saved to one of the folders on a Dell computer with Windows 10 OS. The computer also has SQL Server Management Studio (v 17.1). You should be able to restore using the SQL Server Management Studio installed when you installed the SQL Server 2012 Database engine.

Follow these steps to restore the Northwind database to an instance of SQL Server 2012 (x86) installed on the same computer.

Step 1. Start SQL Server Management Studio v17.1 (Run as administrator)

The SSMS is version 17.1 and Hodentek9\PCATT is a SQL Server 2012 Express

Step 2. Right click the Databases node highlighted in the PCATT isntnace as shown.


RestoreDB_01

Step 3: Click Restore Database...

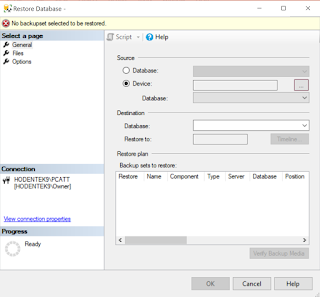
Restore Database window is displayed as shown.


RestoreDB_02

Step 4: The Default Source is Database and it is greyed out as shown. Chnage it to Device. The Restore Database gets changed as shown.


RestoreDB_03

Step 5: Click the ellipsis button along 'Device' in the above image.

Select backup devices window shows on top of Restore Database window as shown.


RestoreDB_04

Step 6: Click Add button in Select backup devices window.
Locate Backup File window gets displayed as shown.


RestoreDB_05

Usually the 'backup files with extension .bak' are found in the following directory in the case of x32 bit SQL Server.
C:\Program Files (x86)\Microsoft SQL Server\MSSQL11.PCATT\MSSQL\Backup

However, for this exercise it is stored in a different location.

Step 7: Now browse to that location and highlight the Northwind.bak (A backup file which came from a Microsoft site) as shown.


RestoreDB_06

Step 8: Click OK. The file path is entered in the Select backup devices window as shown.


RestoreDB_07.png

Step 9: Click OK
You are returned to the Restore Database - Northwind as shown.


RestoreDB_08.png

Step 10: Click OK in the above.

Microsoft SQL Server Managment Studio message reports that the database
'Northwind' restored successfully.


RestoreDB_09.png

Step 11: Click OK to the message. Verify that Northwind database is in the SQL Server 2012 instance Hodentek9\PCATT


RestoreDB_10.png


Bye


Saturday, September 10, 2016

Power BI Charts 2: Histogram

This is a also a very common basic chart. Histogram plots the frequency of occurrences. The input required for this is just one column of data.

Here is an example of a Histogram of quantity of items ordered from the Northwind databases' [Order Details] column.


Histogram.png
Note that R does not interpret Quantity as a numeric and further processing of data is necessary before it can be plotted using R Script in Power BI.

Note: Without the unlist() dataset1 will be double. With unlist() it becomes a numeric.

===============
dataset1=as.numeric(unlist(dataset))
hist(dataset1, main="Distribution of Quantity")

=============

Source of data: SQL Server 2012 | Northwind Database
Power BI: August 2016 Update


Wednesday, August 10, 2016

Importing a data-tier application to SQL Server 2016

You have seen how to export a data-tier application of a database in  SQL Server 2012. In fact, we exported one of the oldest of Microsoft's Sample Databases, the TestPubs. We also saw some limitations in this process of export due to incompatible data, although we have not fathomed as yet what type of data is incompatible.

When the process of export succeeds you create a .bacpac file which can be saved either to a local drive or to Microsoft Azure SQL Database. In our previous export we exported a TestPubs.bacpacfile from TestPubs database to the local drive.

In this post, you will see how you can import it into a higher version of SQL Server, SQL Server 2016.

Start up the named instance of SQL Server 2016. You can see that the server has no user database presently except the one we created recently (AdventureWorks2014).


ImportDT_07

Make a right click on the Databases node in SQL Server 2016 as shown.


ImportDT_00

Click on Import Data-tier Application... submenu to launch the import wizard's Introduction page as shown. Read the instructions on this page.


ImportDT_01

Click Next to display the Import Settings page. Click on the ellipsis button to browse the default page where the .bacpac files are stored as shown.


ImportDT_02

The file enters the processing by the wizard as shown.


ImportDT_03

Click Next to display the Database Settings page. The deployment is targeted to the SQL Server 2016 and .mdf and .ldf files are created. You can change the database name and herein it remains unchanged.


ImportDT_04

Click Next to display the Summary page as shown - Deployment details, file and target as shown.


ImportDT_05

Click Finish. There is little bit of processing activity as shown.


ImportDT_06

The operation has succeeded as shown.


ImportDT_08

The TestPubs database is now found in SQL Server 2016 (you may need to Refresh the Databases node).


ImportDT_09
The data has also entered the database as shown in one of the queries on the TestPubs in SQL Server 2016.


ImportDT_10

Well. It is quite simple and not a line of code is needed!


Thursday, May 12, 2016

Stretch Database is a nice feature of SQL Server 2016

Source: MSFT Blog

Why do you need this?

Well you want to archive data (historical) but you do not want to store it locally as it is not frequently accessed and your resources are inadequate. However you do want to access. No problem, a query in SSMS can access that data (remotely stored in Azure) as easily as the on premises data. It is possible there may be a bit of latency from the remote site.

SSMS 2016 has a very good wizard to take care of the Stretch Database.  The Wizard is accessible via the Object Explorer. You need to select the database you want to extend using the Stretch Database feature. It is not necessary that you choose an entire database to extend; you can use the filter to include what you need to go into the Stretch database. Of course, since the remote is on Azure, you should have an account and proper credentials. The Stretch database is always online and querying should have no problem.

Stretch database is compatible with the other features; Transparent Data Encryption and Always Encrypted and Row-Level Security features.

You do require a Azure account but a free trial is available. There is a price for everything including the new Stretch database feature.

More here:
https://blogs.technet.microsoft.com/dataplatforminsider/2016/04/13/keep-data-virtually-forever-with-stretch-database-in-sql-server-2016/

Monday, May 9, 2016

Import/Export Wizard Simply Explained

Import/Export Wizard is an utility program you find in SQL Server (almost all versions) that can be used for Exporting or Importing data between SQL Servers; between SQL Server and a number of other data sources; or import/export data between data formats including databases, spreadsheets and text files.


DTSW_00 and DTSW_01.png

Export/Import utility can be launched from a database node in a SQL Server or from command line by typing in DTSWizard at command prompt.
The Welcome screen of the Wizard is displayed as shown.


DTSW_02

Let us consider a simple case of copying a database from SQL Server 2012 to SQL Server 2014. I am choosing this pair as I have the two servers on my computer.


DTSW_03
In particular, I will be exporting the pubs database in SQL Server 2012 to the named instance of SQL Server 2014.

DTSW_04

In the SQL Server Import Export Wizard (DTSW) I launched from command-line earlier, I click Next.
The Choose a Data Source page is displayed as shown.


DTSW_05

Click on the drop-down handle for Data source: as shown in the next image. You will see the various data sources handled by this wizard.


DTSW_06

We shall use the default data source, in this case the SQL Server Native Client 11.0. Note that the program automatically chose the named instance REGENCYPARK (SQL Server 2012). However, both the SQL Servers are accessible to this program. Since we are exporting from SQL Server 2012 to SQL Server 2014, RegencyPark server is correct. We will export to Everest server.

DTSW_07

Since both servers were originally installed to work with Windows Authentication accept the default. There is a <default> Database. Click on the handle and set it to pubs by choosing it in the drop-down. Do not worry if you do not have pubs. It should work with any other choice.


DTSW_08
With all the choices made so far, the Choose a Data Source window should appear as shown.


DTSW_09

Click Next to display the Choose a Destination screen as shown.


DTSW_10

Enter the following on this screen:
Destination: SQL Server Native Client 11.0
Server Name: Hodentek8\EVEREST
Authentication: Windows
Click on the handle for Database. The following drop-down is displayed.


DTSW_11

Click on the button New... to open the following Create Database window.


DTSW_12

Insert a name at the top. Herein pubs2. Accept all other defaults, and the database files that are going to be created are displayed inside the screen The OK button at the bottom becomes active. Click OK.
 The Choose a Destination window appears as shown.


DTSW_13

Click Next> to display the Specify Table Copy or Query as shown.


DTSW_14

Accept the default, Copy data from one or more tables or views. Click Next> to display the Select Source Tables and Views with check boxes for each of the tables or views in the pubs database.

DTSW_15

Place check mark for the checkbox Source: and all the tables will be selected as shown.

DTSW_16

We will not edit the mappings (how the tables should go into the destination). Of course you can click Help to get to the help menu.

Click Next. The Save and Run Package is displayed. We accept the first option (Default) Run immediately. The other option is to save it as a SQL Server Information Services (SSIS) package.

DTSW_17

Click Finish>>| (you could also click Next> and look at some more details of what you have chosen to do so far). Complete the Wizard screen is displayed as shown:


DTSW_18

Click Finish on this screen. The program enters an execution stage and finally comes up with a screen announcing success and the number of rows transferred etc. as shown.


DTSW_19

Click on the Report button to display this drop-down list. You may choose an action you want to take.

DTSW_20
Now, go to the EVEREST server in SQL Server Management Studio for version 2014 and verify that pubs2 has been created and it has tables and data.


DTSW_21

That's it. Thanks for reviewing this post. 


Friday, March 25, 2016

Scripting a database in SQL Server 2012

You may need to use your database on one server on another server. Perhaps you just want to have a copy to work with to try something. In this case you need to somehow get it on to the other server. The following video created using Microsoft Sway shows the procedure. Just use the navigation keys at the bottom right.

Enjoy this new format of presentation.

Wednesday, March 9, 2016

Hands-on Learning Event in Honolulu 1 : Introduction to Structured Query Language

The above course will be offered again (April 14-May 17, 2016) as a non-credit course by the Pacific Center for Advanced Technology Training.


Course summary:

Databases, organized repositories of information, have become indispensable and in fact even more relevant despite the emergence of Big Data in today's world.

In this introductory course you will learn about relational databases and the basics of Structured Query Language (SQL) including sorting; grouping result sets; using DDL, DML, DCL, and TCL. All SQL statements will initially be written for one table. Most practical, modern and relational databases will include a large number of tables and SQL queries have to access information from several tables. This course will then introduce you to querying more than one table. With this skill you will be able to query two or more tables in a database. This is a hands-on course which will take you from installing SQL Server 2012; learning the ins and outs of SQL Server Management Studio and of course a full dose of SQL.

During each meeting the students will be assessed for their knowledge, competency and proficiency in SQL.

New this session:
SQL Azure Database: SQL Server in Microsoft Cloud
Windows PowerShell for SQL Server

My sincere thanks and best wishes to the January batch of students.

Thursday, March 3, 2016

Easy way to backup a SQL Server Database

You may need to backup a SQL Server database. What tool would you use? Of course you can use the SQL Server Management Studio, a great tool, agreed. But there is an easier tool which comes with your Windows 10 Installation. The Windows PowerShell, another great program from Microsoft.

This Swaytorial (Swaytorial 3) shows you how to do it in  1-2-3 steps. Enjoy! Just use the navigation guides at the bottom right.


CC

Thursday, February 11, 2016

Attaching AdventureWorks2012 database to a SQL Server Instance


Sample database files are great if you are interested in learning the basics of SQL Servers and SQL Querying.

After installing the SQL Server the first thing you may have to do is bring in some data. Microsoft has provided lots of samples and AdventureWorks is one such database of a hypothetical company and it is bigger than the Northwind database of a hypothetical company.

Here is a Swaytorial that helps you to bring in data to your server. Enjoy!


Wednesday, January 27, 2016

Find everything about objects and columns in SQL Server 2012

In SQL Server 2012, sys.columns is a view you can find in the node System Views in the msdb database.

The various columns in sys.views are shown in this next image. You can find everything about the Columns in this view.


If you know the ObjectID of the Column of a table in the database, you can find its name from this query, the intellisense gives you an idea of this selection.

SysColumnName.png

A typical query and its output are as shown for finding the column name from ObjectID.

SysColumnName_02.png

If you know the Column_Name then you can find Column_ID, the intellisense gives you an idea of this selection.

SysColumnID.png

A typical query and its output are as shown for finding Column ID from Column Name.

SysColumnID_02.png

Starting from table name you can get the columns from these queries:

You can also get the ObjectID of the table from this query:

Use Northwind
go
Select *
From sys.tables
where tables.name='Employees'

go

The above query returns one value=245575913
Using the above you can get a whole lot of information for the columns from this query:

Select *
from sys.columns
where Columns.object_id=245575913


When Identity Security Becomes a Wall — Not a Shield

After a breach that forced a reset of my digital identity, I hit a roadblock I never anticipated: multi-factor authentication (2FA) locked m...