Primary Key is a basic requirement for establishing relationship between tables. Two or more tables are related by means of Primary Key and Foreign Key relationships.
Can you add a Primary Key column to a existing populated table?
The answer is, yes you can, you can use T-SQL code or SQL Server Management Studio to add a column. Modification of objects is at the heart of maintenance.
This post shows you how to add a Primary Key column, step-by-step. I will be using SQL Server 2012 but the procedure is similar with probably some very minor variations in other versions.
The first thing is to make sure that when you save changes the table is not recreated. You can do this by removing the check mark from here (Prevent saving changes that require table re-creation).
The Options menu is accessed from Tools | Options... .

Creating a table with three columns:
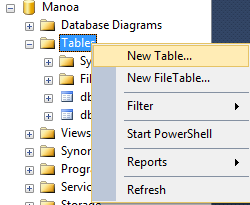
I will be creating a new table in a database Manoa in an instance of SQL Server. Using the drop-down shown you can create a new table.


Populating the table with 3 rows
Right click dbo.Client under the Tables node. From the drop-down select 'Edit Top 200 Rows '. The next window will be displayed with just the first two with all Nulls. Enter the names by clicking on the Nulls under Lname; then under Fname and then under age. When you finish the 1st row, the second row is displayed again with Nulls. Repeat the above using names shown (you may user your own but of proper data type) for rows 2 and 3. We assume only 3 rows to exist in this table. It can contain any number of rows. Click the Close(x) button.


Adding the Identity column
Right click dbo.Client table in Object Explorer in the Tables node. The following window with two panes open as shown. You may need to click the 4th row below the one with Lname 'Amanda' in the above to add the Id column.

For ColumnName enter 'Id'. For DataType enter or choose 'tinyint' and place check mark for Allow Nulls as shown. The bottom pane is automatically populated as shown.

In the bottom pane scroll down to the line shown, 'Identity Specification' . Change from 'No' to 'Yes' indicating you want Id to be an identity column. The Identity Increment and Identity Seed gets filled with default values and you will notice that the check mark for Allow Nulls is removed as soon as you make these changes.
 After making Id the identity column your table design is displayed as shown.

Again run a Select statement as shown and you will see the Id column as being added to your table.
 Adding the Primary Key
Now that you have added the Identity column, you will now designate that column to contain the Primary Key.
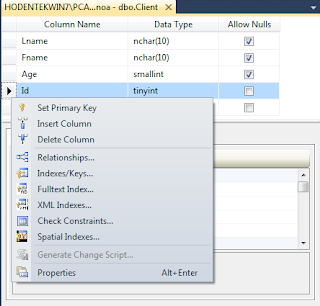
Open the table in design view. Highlight the row containing Id and then right click that row to open a drop-down menu as shown.


This completes the procedure to add an identity column to a pre-existing, populated table.
Can you add a Primary Key column to a existing populated table?
The answer is, yes you can, you can use T-SQL code or SQL Server Management Studio to add a column. Modification of objects is at the heart of maintenance.
This post shows you how to add a Primary Key column, step-by-step. I will be using SQL Server 2012 but the procedure is similar with probably some very minor variations in other versions.
The first thing is to make sure that when you save changes the table is not recreated. You can do this by removing the check mark from here (Prevent saving changes that require table re-creation).
The Options menu is accessed from Tools | Options... .

Creating a table with three columns:
I will be creating a new table in a database Manoa in an instance of SQL Server. Using the drop-down shown you can create a new table.
When you click New Table... above the next pane opens in SSMS with a default table name Table_1 which can be changed to the one you give after configuring it as shown. Enter Fname under ColumnName, then Data Type comes up as nchar(10). If it does not you can select from the list. Place check mark for Allow Nulls (which means this column may have a value or may not, it is nothing unless something is entered).

When you close this window, the next window is displayed.
When you click Yes, the above table will be saved and you get the opportunity of overwriting the default name with one of your own as shown.

'
Herein table name was changed to Client. The table Client gets created which you can see in the Table node in Object Explorer. You may need to refresh the Table node (by right clicking and choosing Refresh). The next picture shows the columns of the Client table and the columns that you added.
Populating the table with 3 rows
Right click dbo.Client under the Tables node. From the drop-down select 'Edit Top 200 Rows '. The next window will be displayed with just the first two with all Nulls. Enter the names by clicking on the Nulls under Lname; then under Fname and then under age. When you finish the 1st row, the second row is displayed again with Nulls. Repeat the above using names shown (you may user your own but of proper data type) for rows 2 and 3. We assume only 3 rows to exist in this table. It can contain any number of rows. Click the Close(x) button.

The table gets saved with the values you entered. When you run the Select query as shown, you will see the three rows with values you entered. The column with no name shows just the row numbers.
Adding the Identity column
Right click dbo.Client table in Object Explorer in the Tables node. The following window with two panes open as shown. You may need to click the 4th row below the one with Lname 'Amanda' in the above to add the Id column.

For ColumnName enter 'Id'. For DataType enter or choose 'tinyint' and place check mark for Allow Nulls as shown. The bottom pane is automatically populated as shown.

In the bottom pane scroll down to the line shown, 'Identity Specification' . Change from 'No' to 'Yes' indicating you want Id to be an identity column. The Identity Increment and Identity Seed gets filled with default values and you will notice that the check mark for Allow Nulls is removed as soon as you make these changes.


Again run a Select statement as shown and you will see the Id column as being added to your table.

Now that you have added the Identity column, you will now designate that column to contain the Primary Key.
Open the table in design view. Highlight the row containing Id and then right click that row to open a drop-down menu as shown.

Choose, Set Primary Key. The Id column will now show a 'Key' left to the column as shown.

After the above step, you will have set the Identity column to have the Primary Key. Expand the dbo.Client table as shown to see the 4 columns and the Key you added.

This completes the procedure to add an identity column to a pre-existing, populated table.


No comments:
Post a Comment