HeidiSQL is a client application and you can use it to work with databases. If you want to know more about it, or download and install HeidiSQL go here.

The Heidi Session Manager is launched as shown.
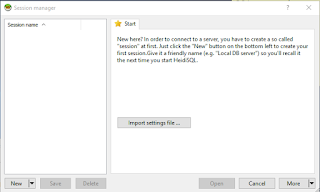
Heidi_Session_00.png
Click New and choose Session in root folder from the drop-down list as shown.

Heidi_Session_01.png
You can change the session name by over-writing as shown. Herein it is Nov21.
 Heidi_Session_02.png
By default the connection is to MySQL using TCP/IP and localhost(127.0.0.1)
Let us change the Network type to Microsoft SQL Server using TCP/IP by using the drop-down menu shown.

Heidi_Session_03.png
Choose Windows authentication as shown.
 Heidi_Session_04.png
Click Open. The connection is refused.
 Heidi_Session_05.png
OK. Let us look if the SQL Server has started. Open the Control Panel|...|Services and verify that the server has started. Indeed it is running (option chosen at SQL Server Installation).
 Heidi_Session_06.png
Now let us change the Hostname /IP to Hodentek8\RegencyPark (over write 127.0.0.1)
Click Open after changing the hostname.
You may get a save modifications message.
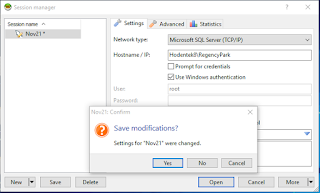
Heidi_Session_07.png
Click Yes. The program processes this information and the client is now connected to the named instance of SQL Server 2012 as shown.
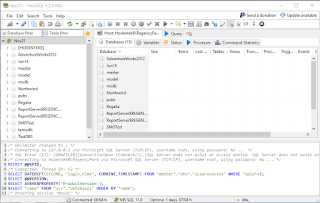
Heidi_Session_08.png
Now you are cooking!

The Heidi Session Manager is launched as shown.

Heidi_Session_00.png
Click New and choose Session in root folder from the drop-down list as shown.

Heidi_Session_01.png
You can change the session name by over-writing as shown. Herein it is Nov21.

By default the connection is to MySQL using TCP/IP and localhost(127.0.0.1)
Let us change the Network type to Microsoft SQL Server using TCP/IP by using the drop-down menu shown.

Heidi_Session_03.png
Choose Windows authentication as shown.

Click Open. The connection is refused.

OK. Let us look if the SQL Server has started. Open the Control Panel|...|Services and verify that the server has started. Indeed it is running (option chosen at SQL Server Installation).

Now let us change the Hostname /IP to Hodentek8\RegencyPark (over write 127.0.0.1)
Click Open after changing the hostname.
You may get a save modifications message.

Heidi_Session_07.png
Click Yes. The program processes this information and the client is now connected to the named instance of SQL Server 2012 as shown.

Heidi_Session_08.png
Now you are cooking!


No comments:
Post a Comment