This post describes installation of SQL Server 2014 CTP1 on a Windows 8 partition of a computer which has Windows 7 Ultimate on the other partition.
The reason for installing SQL Server 2014 CTP1 on the Windows 8 partition were described in the previous post here:
http://hodentekmsss.blogspot.com/2013/09/some-problems-to-install-sql-server.html
The setup program was run from a disc created from an .iso file from the download page here:
http://technet.microsoft.com/en-us/evalcenter/dn205290.aspx
The installation steps and the various considerations have been described in great detail in my two books here.
http://hodentek.blogspot.com/2013/06/learn-sql-server-2012-reporting.html
http://www.packtpub.com/learning-sql-server-2008-reporting-services/book?mid=010409ofvkyp
I will present only the screen shots with some relevant explanations.
The disc is in the dvd drive with the OS as Windows 8 Preview (expired at this time).
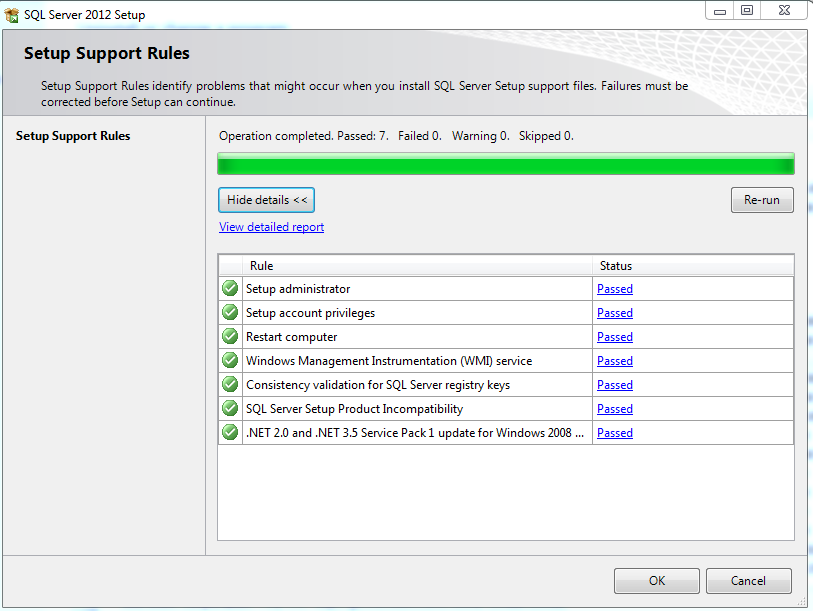
 Running the Setup.exe brings up the installation center which does the setup support rules check as shown.


Click OK.


There is only one warning. No worry, Click Next. In the Setup Role window you can choose the way you want to install the server. Here only the first option was chosen. In 'Learning SQL Server Reporting Services 2012' book I have completely described all the options. Herein, only first option will be used.


Click Next.


The entry for object name was arrived at by clicking the Advanced button on the above and choosing the appropriate account as shown here. The chosen user is one at the very bottom of the screen. When you double click the line in this window, it gets into the previous window (you need not type in).


Click Next. Ready to Install page is displayed. Review all the options you have chosen. Of course you could still make changes by hitting the 'back<<' button and make changes.

Click Install. The installation begins.

During this process the computer shutdown (automatically) due to Windows 8 problem. When it was rebooted it did not pick up from this point.
The Setup.exe was run once again and a default instance was installed following the same line as indicated above). The installation was a success as shown.

Clicking on the last app, 'SQL Server Management Studio' brings up the splash as shown.
 The login is very similar to the previous versions and brings up the Object Explorer after entering the credentials.

An attempt was made to look at the instances of SQL Server installed through the discovery tool as shown.

The reason for installing SQL Server 2014 CTP1 on the Windows 8 partition were described in the previous post here:
http://hodentekmsss.blogspot.com/2013/09/some-problems-to-install-sql-server.html
The setup program was run from a disc created from an .iso file from the download page here:
http://technet.microsoft.com/en-us/evalcenter/dn205290.aspx
The installation steps and the various considerations have been described in great detail in my two books here.
http://hodentek.blogspot.com/2013/06/learn-sql-server-2012-reporting.html
http://www.packtpub.com/learning-sql-server-2008-reporting-services/book?mid=010409ofvkyp
I will present only the screen shots with some relevant explanations.
The disc is in the dvd drive with the OS as Windows 8 Preview (expired at this time).


Clearly to proceed further the Visual Studio program shown in the next screen must be removed.

After removing the file the Setup.exe was run again and this time there are no complaints regarding older programs.

Click OK.

The option is the 'Evaluation edition'. Click Next. Then you accept the license terms and click Next to install the files required for this installation.

When this is finished click Install.
Installation steps will start.

There is only one warning. No worry, Click Next. In the Setup Role window you can choose the way you want to install the server. Here only the first option was chosen. In 'Learning SQL Server Reporting Services 2012' book I have completely described all the options. Herein, only first option will be used.

Click Next. In the Feature Selection window all options have been chosen. You should install only those you require as it will require lot more resources for everything to be installed. The screen was fully stretched out to see everything there is to install. The explanation for the highlighted item is shown alongside on the right.

Click Next. The program checks to see if the installation will proceed without a problem.

Click Next.

Now you need to specify whether you require a named instance of the server or a default instance. The default instance will be named MSSQLSERVER, but the named instance takes whatever name you provide here.
Although the author planned a named instance and went through the complete steps, the computer automatically shutdown (may be something that was built-in to windows 8 if the license has expired) and the server was not configured completely. A default instance was later installed following essentially the same steps.
click Next. Now the program looks at the space available for the program. The program requires over ~7GB.

Click Next. You need to configure the server as well as collation. The screen shows the default that comes up.

This was modified so that the 'admin' (single user) can work with the server. The same Account Name and password (that of the computer administrator) for all the programs and services as shown in the next image was used.

The entry for object name was arrived at by clicking the Advanced button on the above and choosing the appropriate account as shown here. The chosen user is one at the very bottom of the screen. When you double click the line in this window, it gets into the previous window (you need not type in).

Click OK to Select User or Group window and it gets into the Account Name window. Type in the password for the user. Repeat the same for all programs and services as shown.

Choose the default collation. Click Next. Next is Database Engine Configuration

Here the Windows Authentication will be used and the current user is the administrator
as well. The Windows 8 partition has the name 'Newwin8' and the Windows 7 partition was called 'Hodnetekwin7' which was used in the previously cited book.
Also Windows 8 uses the LiveID of the user for username and therefore the current user is 'Jayaram Krishnaswamy' shortened as 'Jayaram'. I am not sure if this will create a problem while typing in credentials. Data Directories are part of the Database Engine Configuration.

FileStream is also part of Database Engine Configuration. Place check marks as shown.

Click Next. Analysis Services configuration page comes with two options to choose from. Here the
Multidimensional Model configuration is chosen. In the early stages of SQL Server 2012 you were required to use the 'Tabular Model' option to be able to create Power View reports in SQL Server Reporting Services in SharePoint Integrated mode. This restriction does not apply anymore.

Similar to Database Engine you designate the current user as admin (or any other you choose to). The Data Directories tab gives you an option to modify the location but here the defaults are chosen. Click Next.
You move on to Reporting Services Configuration as shown. Install only is not the option used and it works better as quite a lot of the Configuration will be complete when you finish the installation. Otherwise you need to configure from scratch. For SharePoint Integration only necessary files are installed and you will have to use SharePoint's Central Administration to complete. This part is explained in detail in my previously cited book here, http://hodentek.blogspot.com/2013/06/learn-sql-server-2012-reporting.html
You move on to Reporting Services Configuration as shown. Install only is not the option used and it works better as quite a lot of the Configuration will be complete when you finish the installation. Otherwise you need to configure from scratch. For SharePoint Integration only necessary files are installed and you will have to use SharePoint's Central Administration to complete. This part is explained in detail in my previously cited book here, http://hodentek.blogspot.com/2013/06/learn-sql-server-2012-reporting.html

Click Next. The Distributed Replay Controller is very much like SQL Profiler but more versatile and scalable. It is included here for completeness only. Read the notes on the right. The Current user has unlimited access to this service.

Click Next. You need to specify the controller and the directories for the client files. Default is chosen.

Click Next. The error reporting so that Microsoft can improve installations. Place checkmark (suggested).

Click Next. Installation Configuration Rules will be checked. It is looking good!

Click Next. Ready to Install page is displayed. Review all the options you have chosen. Of course you could still make changes by hitting the 'back<<' button and make changes.

Click Install. The installation begins.

During this process the computer shutdown (automatically) due to Windows 8 problem. When it was rebooted it did not pick up from this point.
The Setup.exe was run once again and a default instance was installed following the same line as indicated above). The installation was a success as shown.

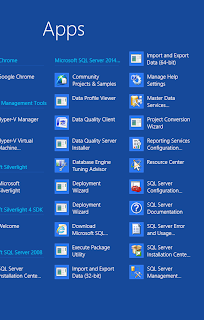
The SQL Server 2014 CTP1 related items appear as apps as shown here.

Clicking on the last app, 'SQL Server Management Studio' brings up the splash as shown.


An attempt was made to look at the instances of SQL Server installed through the discovery tool as shown.

Looks like Analysis Services (mysore) was installed but not configured.
This completes the installation of SQL Server 2014 CTP1 on Windows 8 preview.


