This post will describe the following:
1. Creating a SSIS package to retrieve a few columns from an SQL Server 2012 database Source and send it to a Recordset Destination. Only the Source configuration is described. In Part 2, the Recordset Destination will be described followed by the next step.
2. Executing the package in the first step.
The preparatory steps for this process are the following:
1. You should install SQL Server 2012 and attach a database to work with.
- Installing SQL Server 2012 step-by-step described here
- Attaching a sample database is described here
- Installing a database using script as described here
2. You should have preferably the latest (even earlier version will do), SQL Server Data Tools (SSDT); either a shell program or as part of a Visual Studio program (2012,2013, or 2015).
.Installing SSDT described here (http://hodentekmsss.blogspot.com/2015/09/there-are-quite-few-versions-of-sql.html)
What this package will do?
This package connects to the SQL Server Instance and extract some data from the server which is the source of data. The extracted data is then routed to the destination which is the simplest one, the
Recordset Object.
In order to get the data out of SQL Server 2012 we will use a
ADO NET Source in the SQL Server Integration Sources
Toolbox.
For the destination we will use the
Recordset Destination also in the same
Toolbox.
Step-by-step procedure to configure the ADO.NET Source:
We take the source and destination and place them on the designer pane of the SQL Server Integration Services user interface and establish connections in such a way data flows from the Source to the Destination. This is true of most of the data flows. During the flow the data can be monitored.
Click on the
Control Flow tab and from
Toolbox ; drag and drop a
Data Flow Task on to the designer pane as shown. After dropping the
Data Flow Task it will be displayed in the designer as shown.
ADONET_dec27_05
Right Click the
Data Flow Task to dsiplay the options in the pop-up as shown.
ADONET_dec27_06
Click
Edit and the tab changes to
Data Flow as shown. The bottom pane is reserved for
Connection Manager which manages the connection information for the data sources and data destinations.
ADONET_dec27_07
Move over to the bottom pane
Connection Managers and right click to add a new connection manager to the SSIS Package as shown.
ADONET_dec27_08
Click
New ADO NET Connection... The
Configure ADO.NET Connection Manager window is displyaed as shown.
ADONET_dec27_09
Click button
New... at the bottom. The
Connection Manager window is diaplyed on top of the previous window as shown.
ADONET_dec27_10
The data provider is
.NET providers\SqlClient Data Provider. The Server name: field is blank. Click
Refresh and then click the drop-down handle to the left of it. The installed SQL Server Instance is displyed as shown.
ADONET_dec27_11
At the same time, the
Select or enter database name: field becomes active. Click on the handle in this field and the list of databases in this on this instance of SQL Server is displayed as shown.
ADONET_dec27_12
Herein the database
Northwind is chosen (you can choose any). When you click on the database in the list, the database will be the one which will be selected.
The Log on to the server did work with the first option (
Use Windows Authentication) because the database list was displayed (if it is wrong, it will not). If you go back and look at the SQL Server 2012 Installation you will notice that
Windows Authentication was the choice at installation time.
Click
Test Connection button.
The success of the test is reported in the message shown.
ADONET_dec27_13
Click
OK to the message as well as the one on the
Connection Manager window.
The Configuration ADO.NET Conneciton Manager window gets filled up with the required information as shown.
ADONET_dec27_14
Click
OK. The
Configuration Manager window gets closed and the
Connection gets added to the
Connection Managers pane as shown.
ADONET_dec27_15
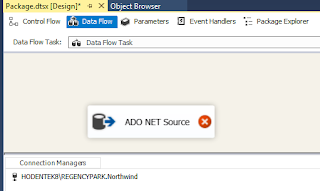
Note: There may be a problem in this interface, the ADO NET Source added should be in the design pane, but it had disappeard. It was added again as shown.
ADONET_dec27_16
Right click the
ADO NET Source (the red circle with the cross means it is not completly configured) to display the pop-up window.
ADONET_dec27_17
Click
Edit...
The
ADO.NET Source Editor is displayed as shown. ADO.NET Connection Manager has already updated the field. You can access a
Table or a
View and since it is already connected to the database
Northwind, the table or view will be the one on that database.
Click on the handle for the
Name of the table or the view: as shown. All the tabels and views will appear (only some are in the next image, scroll-down to see more).
ADONET_dec27_18
Choose a database. Herein the
Categories table is chosen.
On the left is the navigation. We just completed the
Connection Manager. Click on
Columns to display the
Columns from this table (
Categories).
ADONET_dec27_19
The Error Output will assume the following. Just accept this default for now.
ADONET_dec27_20
Click
OK.
The ADO.NET Source is Configured now. There are two downward pointing arrow one blue and one red.
ADONET_dec27_21
In Part 2 we will consider the Recordset Destination in detail.


