This post is about deploying a SSIS package using SQL Server Data Tools.
Before you start on this post review the following:
http://hodentekmsss.blogspot.com/2015/12/creating-and-executing-ssis-project.html
http://hodentekmsss.blogspot.com/2015/12/creating-and-executing-ssis-project_28.html
http://hodentekmsss.blogspot.com/2015/12/creating-and-executing-ssis-project_29.html
There are two modes deployment SSIS 2012:
In Solution Explorer right click the project and select Deploy Package as shown:

deploy_02
The wizard Integration Services Deployment Wizard gets displayed. There are a couple of steps (5) you need to follow. This wizard will deploy the package to an Integration Services Catalog on an instance of SQL Server 2012.

deploy_03
Click Next. You need to select the destination.

deploy_04
Click in the box under Server name: and click Browse...
Browse for Servers window is displayed as shown displaying the instance name.

deploy_04a
Click OK to Browse for Servers window. The Browse for Project window is displayed the SSISDB is the only object.

deploy_04b
SSISDB is organized as folders and the Projects are housed in the folders.
Click on New folder...button. The Create New Folder window is displayed as shown.

deploy_04c
Provide a name and a description(Optional) and click OK.
The Browse for Project now contains the folder you created, SSIS_Dec27Pkg.

deploy_04d
Click New project...The Create New Project window us displayed.
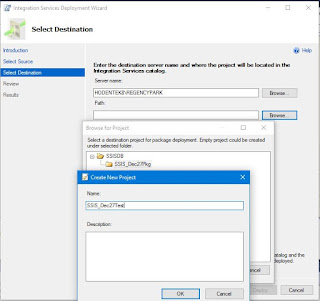
deploy_04e
Provide a name and a description and click OK. The Browse for project window now displays the Project (All these names I have given were taken from my SSIS project created in Parts 1, 2 and 3).
 deploy_04f
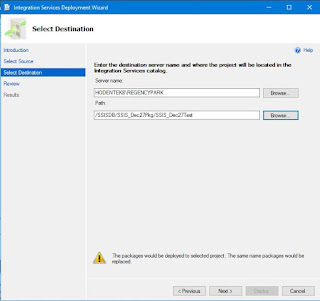
Now click OK. Now the Select Destination page of the wizard has all the needed information as shown.
 deploy_04g
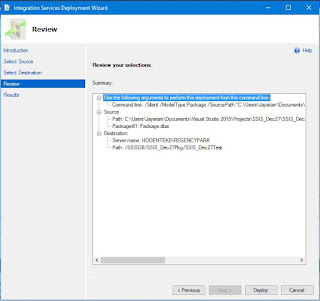
Click Next. The Review you selections section of the Review page is displayed.
 deploy_05
Just check the Source and Destination paths and click Deploy.
After some processing the results are displayed in the Result page of the wizard as shown.
 deploy_06
Looks like the deployment failed for some reason. Clicking the link Failed brings up the next window.
 deploy_07FailedLink.png
The message appears to indicate failing to find a stored procedure. Searching for the package on the SQL Server instance using PowerShell did indicate the creation of folders and projects but did not find the package.
 deploy_08.png
On a hunch, the SQL Server Data Tools was closed and opened with administrative privileges and
the package was deployed to the same folder in the SQL Server.
This time the deployment was successful with any errors.

deploy_09.png
The next image shows the package in the Integration Services Catalogs in SQL Server Management Studio.

deploy_10.png
For getting a jump start on SSIS review my popular book and describes some 20 routine tasks that you can configure. The version may be different but the procedures have not changed much.

https://www.packtpub.com/networking-and-servers/beginners-guide-sql-server-integration-services-using-visual-studio-2005
Before you start on this post review the following:
http://hodentekmsss.blogspot.com/2015/12/creating-and-executing-ssis-project.html
http://hodentekmsss.blogspot.com/2015/12/creating-and-executing-ssis-project_28.html
http://hodentekmsss.blogspot.com/2015/12/creating-and-executing-ssis-project_29.html
There are two modes deployment SSIS 2012:
- A mode to deploy individual packages
- A mode to deploy SSIS projects
In Solution Explorer right click the project and select Deploy Package as shown:

deploy_02
The wizard Integration Services Deployment Wizard gets displayed. There are a couple of steps (5) you need to follow. This wizard will deploy the package to an Integration Services Catalog on an instance of SQL Server 2012.

deploy_03
Click Next. You need to select the destination.

deploy_04
Click in the box under Server name: and click Browse...
Browse for Servers window is displayed as shown displaying the instance name.

deploy_04a
Click OK to Browse for Servers window. The Browse for Project window is displayed the SSISDB is the only object.

deploy_04b
SSISDB is organized as folders and the Projects are housed in the folders.
Click on New folder...button. The Create New Folder window is displayed as shown.

deploy_04c
Provide a name and a description(Optional) and click OK.
The Browse for Project now contains the folder you created, SSIS_Dec27Pkg.

deploy_04d
Click New project...The Create New Project window us displayed.

deploy_04e
Provide a name and a description and click OK. The Browse for project window now displays the Project (All these names I have given were taken from my SSIS project created in Parts 1, 2 and 3).

Now click OK. Now the Select Destination page of the wizard has all the needed information as shown.

Click Next. The Review you selections section of the Review page is displayed.
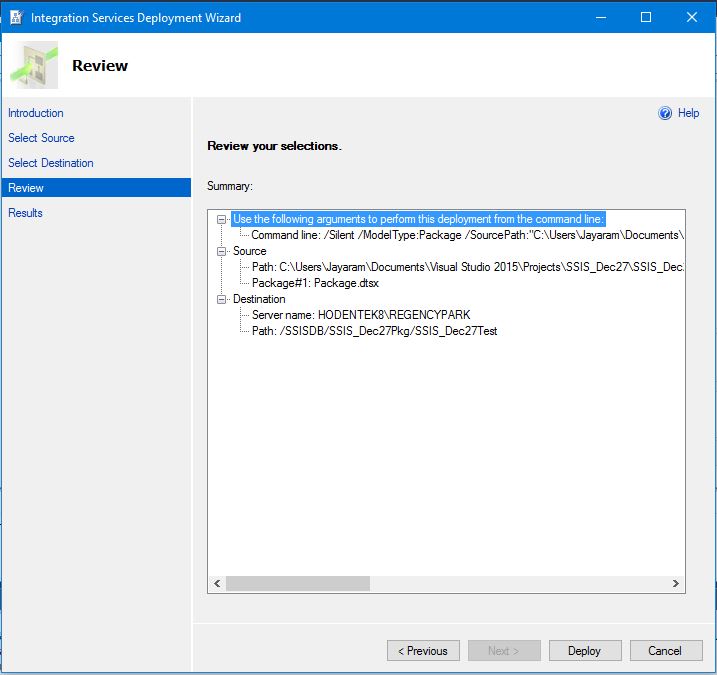
Just check the Source and Destination paths and click Deploy.
After some processing the results are displayed in the Result page of the wizard as shown.

Looks like the deployment failed for some reason. Clicking the link Failed brings up the next window.

The message appears to indicate failing to find a stored procedure. Searching for the package on the SQL Server instance using PowerShell did indicate the creation of folders and projects but did not find the package.

On a hunch, the SQL Server Data Tools was closed and opened with administrative privileges and
the package was deployed to the same folder in the SQL Server.
This time the deployment was successful with any errors.

deploy_09.png
The next image shows the package in the Integration Services Catalogs in SQL Server Management Studio.
deploy_10.png
For getting a jump start on SSIS review my popular book and describes some 20 routine tasks that you can configure. The version may be different but the procedures have not changed much.


No comments:
Post a Comment