Wednesday, November 30, 2016

Install SQL Server 2016 SP1 and get productivity enhancements

SQL Server 2016 Service Pack 1 is released  and now generally available(GA).

According to the above release blog:

Many of the features (listed in the table here) available in Enterprise Edition are now available in several other editions as well after installing the SP1 (Standard, web, express and LocalDB).


SQLSrvrSp1_00

Note that Change Data Capture requires SQL Server Agent not available in Express and In Memory OLTP not possible in LocalDB due to security reasons

DBCC CLONEDATABASE added supports cloning of CLR, Filestream/Filetable, Hekaton and Query Store objects are available after installing SP1

DBCC CLONEDATABASE  (source_database_name, target_database_name)    –– Default CLONE WITH SCHEMA, STATISTICS and QUERYSTORE metadata.
DBCC CLONEDATABASE  (source_database_name, target_database_name) WITH NO_STATISTICS                                                                                               –– SCHEMA AND QUERY STORE ONLY CLONE
DBCC CLONEDATABASE  (source_database_name, target_database_name) WITH NO_QUERYSTORE                                                                                              –– SCHEMA AND STATISTICS ONLY CLONE
DBCC CLONEDATABASE  (source_database_name, target_database_name) WITH NO_STATISTICS,NO_QUERYSTORE                                                          –– SCHEMA ONLY CLONE

New Create/Alter supports modifying and deploying database objects such as
Stored Procedures, 
Triggers, 
User–Defined Functions, and 
Views

This is just a short list from more than a dozen others. Make sure you visit the link referenced at the top.

The SQL Server 2016 Enterprise specific sample database, WorldWorldImporters can now be used in Standard and Express editions.

Download SQL Server 2016 SP1 here .

If you are just starting out on Reporting Services follow the instructions here:

https://hodentekmsss.blogspot.com/2017/05/installing-sql-server-2016-sp1-for.html

Monday, November 28, 2016

Using JSON Validator in SQL Server

The Transact-SQL IsJSON() tests whether a expression(string) is JSON valid. If it is valid you should get a 1 as return value, a zero(0) if it is not valid and a null if the expression is null.

How do you use it?

This is a json string, a very simple one:
=================
{"wclass":{"student":["jay", "john", "sam"]}}
====================
The following code snippet shows how you may use it:
===========
declare @json nvarchar(150)SET @json=N'{"wclass":{"student":["jay", "john", "sam"]}}';
Select ISJSON(@json)

==========
When you run this in the SQL Server 2016 query pane, you get the return value 1 (see image below).


Sunday, November 27, 2016

Retrieve data from SQL Anywhere 17 in JSON format

SQL Anywhere 17 is a SAP Database.  Some of the earlier versions were released by SYBASE.

In SQL Anywhere 17 you have three different ways of getting JSON formatted data / JSON document.

You can use the FOR JSON clause  with:

  • SELECT Statement
  • Subqueries
  • Queries having Group By clause
  • Aggregate Functions and
  • Views
The result is a JSON array consisting of:

  • Scalar elements
  • Objects
  • Arrays
There are three ways of calling the FOR JSON Clause:

  • For JSON Raw
  • For JSON AUTO
  • For JSON Explicit
Note that SQL Server 2016 did get JSON support for the first time and has only For JSON Auto clause.

You run SQL Queries in Interactive SQL. Here is an example of a query that provides json document using the FOR JSON AUTO clause.


InteractiveSQL17JSON

Thursday, November 24, 2016

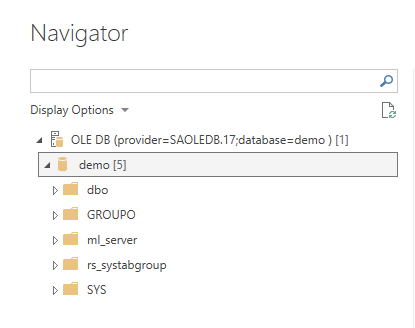
Problem connecting to SQL Anywhere 17 to Power BI using OLE DB - the workaround

 This is a continuation of my previous post wherein the Power BI created connection string spawned an error.

In the previous post we saw that the following connection information did not work.


I changed the connection string by using database instead of Initial Catalog and it seemed to work by displaying the demo database database objects in the Navigator.

However attempting to expand any of them displayed other error messages. Also, even without changing initial catalog to database displayed the same objects in the Navigator.  


There are no other connections to this database and it is not to reason out this error.


It was then decided to try out the Advanced Option in the From OLE DB dialog. 

 
Used the same Connection Information and then in the Advanced Option dialog inserted a SELECT query (you can use any other query) and clicked OK. However there was one more dialog requesting Username/Password.


The response was correctly returned as shown.


I believe the From OLE DB stage of the wizard is not working too well unless you use the Advanced Option. Even with SQL Server 2016, the problem was if one did not use the Advanced Option (this has not been tested yet) the connection will open all the objects on the server and not just the one chosen with the Data Link stage of the wizard.

Wednesday, November 23, 2016

Problem connecting to SQL Anywhere 17 to Power BI using OLE DB

SQL Anywhere 17 is a relational database from SAP. The earlier editions were from the parent company Sybase.

SQL Anywhere 17 is a SAP database. The earlier editions were from the parent company Sybase.

Start SQL Central which is like SQL Server Management Studio for SQL Server and connect to SQL Anywhere Demo 17 database with credentials dba/sql.


Launch Power BI and click on Get Data and choose From OLE DB. Click on Build to open Data Link Properties as shown.


SqlAnyOleDB_00

Choose SQL Anywhere OLE DB Provider 17 from the above drop-down.
Click Next. Provide User Name and Password and click allow saving password and browse to find the database demo. as shown

SqlAnyOleDB_01

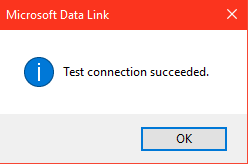
Click demo and click Test Connection.
This should display a success message as shown.


SqlAnyOleDB_02

Click OK. The From OLE DB window gets filled as shown.

SqlAnyOleDB_03

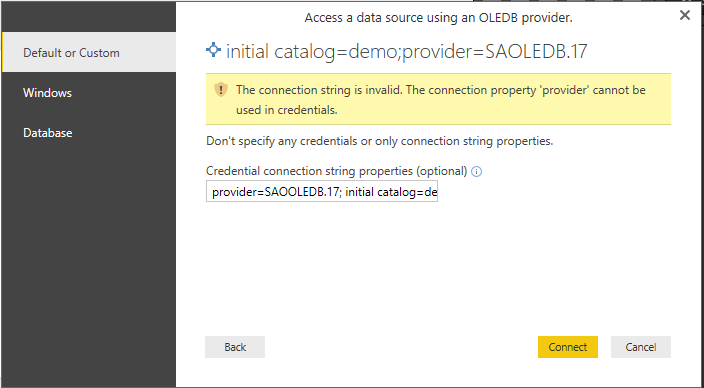
Again the Access a datasource using OLEDB Provider comes up as shown. Actually this UI needs to be better designed. The credentials were already entered in a previous wizard screen.


SqlAnyOleDB_04

Again use the dba/sql password and click connect.

Looks like the Power BI does not accept the UI designed connection string


SqlAnyOleDB_05

The connection string was created by Power BI after accepting valid entries. Looks like there is a problem.


 This is being looked into and come back to this site. The work around will be posted as soon as it is found.


Tuesday, November 22, 2016

Creating a report using JSON formatted data with Power BI - Part 2


This is a continuation of my previous post.

Once the query is properly created turning it into a report in Power BI is quite easy. It takes only a couple of clicks. Here is the last query in the previous post.

The column data types are text and you need to change them. Clicking each column you can change the data type. The title_id is kept as is text. The qty was changed to whole number as well as the ytd_sales column. The Amount column was changed to decimal. Here are the allowed data types in PowerBI.

Now that the plot data is ready you can click the first menu item, Close & Apply in the Query editor.

Now you place Id in the Axis and the other three (Qty, Ytd_Sales, Amount) in the value fields to display a Clustered Column Chart as shown.
or a Multi-row card report as shown.


You can also choose any other chart type.

Sunday, November 20, 2016

Creating a report using JSON formatted data with Power BI - Part 1

Power BI supports retrieving data from a variety of data sources that includes data in JSON format.

In the post you will learn how to retrieve JSON data from SQL Server 2016. You then retrieve this data into Power BI to create a report.

Creating a report requires massaging the JSON data retrieved using the Power BI user interface.

Creating JSON formatted data:

If you want to know how to retrieve JSON formatted data from your database in SQL Server go here:
http://hodentekhelp.blogspot.com/2016/11/how-do-you-retrieve-json-formatted-data.html

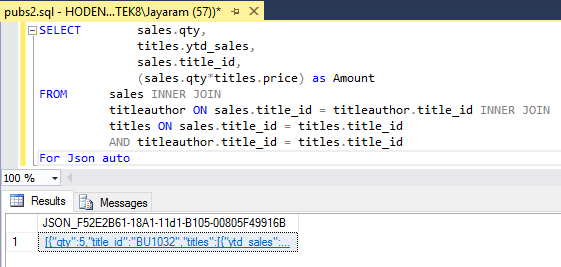
Here is the data that is going to be used in this post. The data is from a query against the pubs database (original compatibility 100) whose compatibility is changed to work with SQL Server 2016.


JsonPowerBI_00

You can run the query and save it as a file. Make sure there are neither extraneous characters in the file (like some sql message) nor does it have white spaces in side the JSON data.

Getting JSON Data into Power BI:


It is very easy to get the JSON data into Power BI. Just use the Get Data menu item in Power BI.

If you want to know details of how to retrieve JSON formatted data into Power Bi go here:
http://hodentekmsss.blogspot.com/2016/11/retrieving-json-data-in-power-bi.html

The data that was created in SQL Server is now retrieved into Power BI.

This is the first step. The data comes into Power BI as a list.
============
JsonPowerBI_01

 This is the formula behind this.
============
Json.Document(File.Contents("C:\Users\Jayaram\Documents\Blog2016\HodentekMSSS2016\Pubs11_20.json"))
==========
You can convert this list into a table using the menu ribbon item To Table in Convert.
After this the UI appears as shown with the list converted to a table.


JsonPowerBI_02.PNG

This is the formula behind this conversion:
=======
= Table.FromList(Source, Splitter.SplitByNothing(), null, null, ExtraValues.Error)
=========
When you click on a single  record this is what you see.
======


JsonPowerBI_03.PNG

The first record has three items shown at the bottom.

Now you can expand the record by clicking on the icon shown on the column 1 to split it into the items by continuously clicking it.

First cancel the dialogue that showed up earlier. Next click on Column1 and then click the icon to expand the column.

This is what happens the first click.
=======


JsonPowerBI_04.PNG
====

After clicking OK, this is what you will see in the Power BI UI.


JsonPowerBI_05
The formula behind the above is as shown here:
========
= Table.ExpandRecordColumn(#"Converted to Table", "Column1", {"qty", "title_id", "titles"}, {"Column1.qty", "Column1.title_id", "Column1.titles"})
============
As you can see that Column1.titles is still a list (and therefore can be expanded).
 ======
This can be further split by clicking on the icon in Column1.titles.

When you click this icon, you will see the following change.
You will observe that the list goes over into Record and the following is displayed.


JsonPowerBI_06

Click OK.
The display changes to this.


JsonPowerBI_07

Observe that there are no more columns ot be expanded.
The formula now appears as shown:
=============
= Table.ExpandRecordColumn(#"Expanded Column1.titles2", "Column1.titles", {"Amount", "ytd_sales"}, {"Column1.titles.Amount", "Column1.titles.ytd_sales"})
=============

Renaming the columns

You can right click on a column and from the drop-down menu rename it. The renamed columns appear like this as shown below. while renaming a column, you may get a message Insert Step. Just click Insert for the message and go to the next column.


JsonPowerBI_08

The formula behind the above is this:
==============
= Table.RenameColumns(#"Expanded Column1.titles3",{{"Column1.qty", "qty"}, {"Column1.title_id", "title_id"}, {"Column1.titles.Amount", "titles.Amount"}, {"Column1.titles.ytd_sales", "titles.ytd_sales"}})
============
The various steps to get to this stage is shown here:


JsonPowerBI_09

Now we have prepared the query and ready to create a report.

Continued in Part 2 here:
Creating a report using JSON formatted data with Power BI - Part 2

When Identity Security Becomes a Wall — Not a Shield

After a breach that forced a reset of my digital identity, I hit a roadblock I never anticipated: multi-factor authentication (2FA) locked m...