Tuesday, April 28, 2015

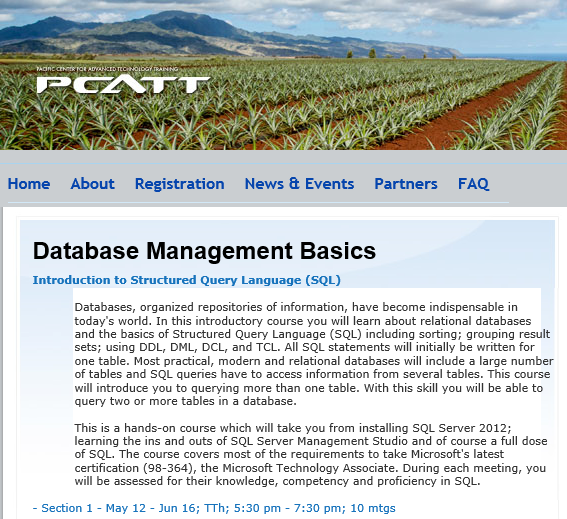
Hands-on Learning Event in Honolulu: Introduction to Structured Query Language

This was offered once in 2012 and once in the beginning of this year and was a total success. It is offered once again to those who could not make it.
Please register at the PCATT.ORG site.

New in 2015: You will also get an introduction to Windows PowerShell. SQL Server 2012 Express will be used.

For details you can also write to:
Hodentek@live.com with course name in the Subject line.

Attaching a detached database in SQL Server 2012 with Windows PowerShell

In my previous post a simple way to detach a database from SQL Server 2012 using SQL Server Management Studio was described. The same database will be attached in this post.

It can be attached to the server instance with SQL Server Management Studio in the same way.

However, trying to attach the detached database using Windows PowerShell succeeded but the database name was not restored but the database files were successfully attached. This was an unexpected result.

The next picture shows the databases node before and after attaching the Feb6 database using the code shown in this post. After attaching the database while the name of the database expected was "Feb6", a new system assigned name was given to the attached database.


The PowerShell statements for attaching the detached database were run in Windows PowerShell ISE and are as follows:
--
PS SQLSERVER:\sql\Hodentek8\RegencyPark\databases>
$files = new-object system.collections.specialized.stringcollection
$files.add("C:\Program Files\Microsoft SQL Server\MSSQL11.REGENCYPARK\MSSQL\DATA\Feb6.mdf")
$files.add("C:\Program Files\Microsoft SQL Server\MSSQL11.REGENCYPARK\MSSQL\DATA\Feb6_log.ldf")
$server=new-object Microsoft.SqlServer.Management.Smo.Server('Hodentek8\RegencyPark')
$db=new-object Microsoft.SqlServer.Management.Smo.Server
$dbname="feb6"
$server.AttachDatabase($db,$files)
----------
Note that the code was run in the databases context.

Although I specified the database name as feb6, the database name was [Hodentek8] after attaching. Hodentek8 is the host name.

Looking at the properties of the database [Hodentek8] shows that the files of database 'Feb6' were attached.

I do not find Feb6 in the databases collection.


However, I am still figuring out the name change.

Saturday, April 25, 2015

Counting the SQL Server Configuration properties using Windows PowerShell


You have created a SQL Server Instance default or a named instance and you want to find the configurtion properties. You can use Windows PowerShell to count the properties.
For the named instance Hodentek8\RegencyPark the following code will count the number of configuration properties:
$srv = new-object Microsoft.SqlServer.Management.Smo.Server 'Hodentek8\RegencyPark'
#Replace 'Hodentek8\RegencyPark' by ("(local)") for the default instance
$srv.name
$srv
$srv.Configuration.Properties.Count

Launch the Windows PowerShell ISE.
When you run this code in the Windows PowerShell ISE
You will get this response:
PS C:\Users\Jayaram> $srv = new-object Microsoft.SqlServer.Management.Smo.Server 'Hodentek8\RegencyPark' #("(local)")
$srv.name
$srv
$srv.Configuration.Properties.Count

----
Hodentek8\RegencyPark

AuditLevel                  : Failure
BackupDirectory             : C:\Program Files\Microsoft SQL Server\MSSQL11.REGENCYPARK\MSSQL\Backup
BrowserServiceAccount       : NT AUTHORITY\LOCALSERVICE
BrowserStartMode            : Auto
BuildClrVersionString       : v4.0.30319
BuildNumber                 : 2218
ClusterName                 :
ClusterQuorumState          : NotApplicable
ClusterQuorumType           : NotApplicable
Collation                   : SQL_Latin1_General_CP1_CI_AS
CollationID                 : 872468488
ComparisonStyle             : 196609
ComputerNamePhysicalNetBIOS : HODENTEK8
DefaultFile                 : C:\Program Files\Microsoft SQL Server\MSSQL11.REGENCYPARK\MSSQL\DATA\
DefaultLog                  : C:\Program Files\Microsoft SQL Server\MSSQL11.REGENCYPARK\MSSQL\DATA\
Edition                     : Developer Edition (64-bit)
ErrorLogPath                : C:\Program Files\Microsoft SQL Server\MSSQL11.REGENCYPARK\MSSQL\Log
FilestreamLevel             : TSqlFullFileSystemAccess
FilestreamShareName         : REGENCYPARK
HadrManagerStatus           : Failed
InstallDataDirectory        : C:\Program Files\Microsoft SQL Server\MSSQL11.REGENCYPARK\MSSQL
InstallSharedDirectory      : c:\Program Files\Microsoft SQL Server\MSSQL11.REGENCYPARK\MSSQL
InstanceName                : REGENCYPARK
IsCaseSensitive             : False
IsClustered                 : False
IsFullTextInstalled         : True
IsHadrEnabled               : False
IsSingleUser                : False
IsXTPSupported              : False
Language                    : English (United States)
LoginMode                   : Integrated
MailProfile                 :
MasterDBLogPath             : C:\Program Files\Microsoft SQL Server\MSSQL11.REGENCYPARK\MSSQL\DATA
MasterDBPath                : C:\Program Files\Microsoft SQL Server\MSSQL11.REGENCYPARK\MSSQL\DATA
MaxPrecision                : 38
NamedPipesEnabled           : False
NetName                     : HODENTEK8
NumberOfLogFiles            : -1
OSVersion                   : 6.2 (9200)
PerfMonMode                 : None
PhysicalMemory              : 8116
PhysicalMemoryUsageInKB     : 251848
Platform                    : NT x64
Processors                  : 8
ProcessorUsage              : 12
Product                     : Microsoft SQL Server
ProductLevel                : RTM
ResourceLastUpdateDateTime  : 6/12/2012 3:06:43 PM
ResourceVersionString       : 11.00.2218
RootDirectory               : c:\Program Files\Microsoft SQL Server\MSSQL11.REGENCYPARK\MSSQL
ServerType                  : Standalone
ServiceAccount              : .\Jayaram
ServiceInstanceId           : MSSQL11.REGENCYPARK
ServiceName                 : REGENCYPARK
ServiceStartMode            : Auto
SqlCharSet                  : 1
SqlCharSetName              : iso_1
SqlDomainGroup              : NT SERVICE\MSSQL$REGENCYPARK
SqlSortOrder                : 52
SqlSortOrderName            : nocase_iso
Status                      : Online
TapeLoadWaitTime            : -1
TcpEnabled                  : False
VersionMajor                : 11
VersionMinor                : 0
VersionString               : 11.0.2218.0
Name                        : Hodentek8\RegencyPark
Version                     : 11.0.2218
EngineEdition               : EnterpriseOrDeveloper
ResourceVersion             : 11.0.2218
BuildClrVersion             : 4.0.30319
DefaultTextMode             : True
Configuration               : Microsoft.SqlServer.Management.Smo.Configuration
AffinityInfo                : Microsoft.SqlServer.Management.Smo.AffinityInfo
ProxyAccount                : [Hodentek8\RegencyPark]
Mail                        : [Hodentek8\RegencyPark]
Databases                   : {AdventureWorks2012, master, model, msdb...}
Endpoints                   : {Dedicated Admin Connection, TSQL Default TCP, TSQL Default VIA, TSQL Local Machine...}
Languages                   : {Arabic, British, čeština, Dansk...}
SystemMessages              : {21, 21, 21, 21...}
UserDefinedMessages         : {}
Credentials                 : {}
CryptographicProviders      : {}
Logins                      : {##MS_PolicyEventProcessingLogin##, ##MS_PolicyTsqlExecutionLogin##, HODENTEK8\Jayaram, Hodentek8\TestUser...}
Roles                       : {bulkadmin, dbcreator, diskadmin, processadmin...}
LinkedServers               : {}
SystemDataTypes             : {bigint, binary, bit, char...}
JobServer                   : [Hodentek8\RegencyPark]
ResourceGovernor            : Microsoft.SqlServer.Management.Smo.ResourceGovernor
ServiceMasterKey            : Microsoft.SqlServer.Management.Smo.ServiceMasterKey
SmartAdmin                  : Microsoft.SqlServer.Management.Smo.SmartAdmin
Settings                    : Microsoft.SqlServer.Management.Smo.Settings
Information                 : Microsoft.SqlServer.Management.Smo.Information
UserOptions                 : Microsoft.SqlServer.Management.Smo.UserOptions
BackupDevices               : {}
FullTextService             : [Hodentek8\RegencyPark]
ActiveDirectory             :
Triggers                    : {}
Audits                      : {}
ServerAuditSpecifications   : {}
AvailabilityGroups          : {}
ConnectionContext           : Data Source=Hodentek8\RegencyPark;Integrated Security=True;MultipleActiveResultSets=False;Application Name="SQL Management"
Events                      : Microsoft.SqlServer.Management.Smo.ServerEvents
OleDbProviderSettings       :
Urn                         : Server[@Name='HODENTEK8\REGENCYPARK']
Properties                  : {Name=AuditLevel/Type=Microsoft.SqlServer.Management.Smo.AuditLevel/Writable=True/Value=Failure,
                              Name=BackupDirectory/Type=System.String/Writable=True/Value=C:\Program Files\Microsoft SQL
                              Server\MSSQL11.REGENCYPARK\MSSQL\Backup, Name=BuildNumber/Type=System.Int32/Writable=False/Value=2218,
                              Name=DefaultFile/Type=System.String/Writable=True/Value=C:\Program Files\Microsoft SQL
                              Server\MSSQL11.REGENCYPARK\MSSQL\DATA\...}
UserData                    :
State                       : Existing
IsDesignMode                : False
DomainName                  : SMO
DomainInstanceName          : HODENTEK8\REGENCYPARK
69

Friday, April 17, 2015

Can you use Windows Power Shell to find the login you created?

In the previous post you created a login and verified using SQL Server Management Studio but you can also use Windows PowerShell to verify it.
You can do it two-ways. Using Invoke-SQLCMD or use the SQL Server SQL provider -SQLPS

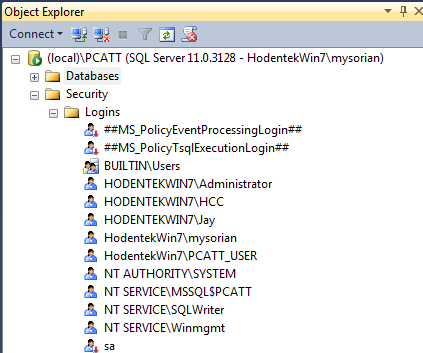
Here are the logins for my instance named PCATT on my laptop Hodentek\Win7 for whim the administrator.


I can use SQLPS after launching as follows:

 
Or I can invoke SQLCMD via Window PowerShell's Invoke as shown here with some sample output:

PS SQLSERVER:\> invoke-sqlcmd -ServerInstance '(local)\PCATT' -Query 'Select * from Sys.syslogins'| export-csv "C:\Users\Public\PCATTLogins"
PS SQLSERVER:\>

The following is a cutout of the PCATTLogins text file on Notepad.


Tuesday, April 14, 2015

Creating a SQL Server User Login using Windows PowerShell

Windows Power Shell is great at administering most things on Windows OS that includes SQL Server as well.

This post describes step-by-step of creating a login for SQL Server 2008 using the SQL Server Management Studio. The same procedure applies to other versions as well.
http://hodentekhelp.blogspot.com/2008/09/how-do-i-create-new-login-for-sql.html

The following shows how you may do this using Power Shell.

Step 1:
In order to do create a login using Power Shell either use an existing Windows User or create a new user for Windows. You can create a new user to Windows desktop or Laptop as shown here.
http://hodentekhelp.blogspot.com/2015/04/how-do-you-create-windows-user.html

Step 2:
Launch Power Shell for SQL Server by executing SQLPS. If you want to know how to do this reivew this link here:
http://hodentekmsss.blogspot.com/2014/08/how-do-you-use-sql-server-powershell.html

Step 3:
After you complete the above step you should be on this line in your Power Shell console (The computer is running Windows 8.1 Profesisonal and the version of Power Shell is 4.0).

Microsoft SQL Server PowerShell
Version 11.0.2100.60
Microsoft Corp. All rights reserved.

PS SQLSERVER:\>

Now declare an instance of SQL Server using the following:

PS SQLSERVER:\> $server = new-Object Microsoft.SqlServer.Management.Smo.Server('Hodentek8\RegencyPark')

Now declare a user UserX using New-Object.. syntax.

PS SQLSERVER:\> $SqlUser = New-Object -TypeName Microsoft.SqlServer.Management.Smo.Login ('Hodentek8\RegencyPark','Hodentek8\UserX')

Here Hodentek8(host) is the name of the computer; RegencyPark is the name of the instance and UserX is the name of the user.

Choose Windows Authentication using the following command and create the login using the following:

PS SQLSERVER:\>SqlUser.LoginType='WindowsUser'

At this point you should have the computer user called UserX for your computer otherwise you will get this error.
-------------
PS : A positional parameter cannot be found that accepts argument '$null'.
At line:1 char:3
+ PS <<<<  SQLSERVER:\> $SqlUser.LoginType='WindowsUser'
    + CategoryInfo          : InvalidArgument: (:) [Get-Process], ParameterBindingException
    + FullyQualifiedErrorId : PositionalParameterNotFound,Microsoft.PowerShell.Commands.GetProcessCommand

------------------------
Now create this login by this:

PS SQLSERVER:\>$SqlUser.create()

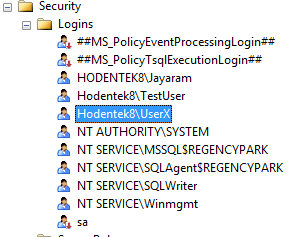
This completes the steps to create a New User Login which you can verify in SQL Server Management Studio as shown here:


Some interesting posts can be found here:
http://hodentekPlus.blogspot.com


Friday, March 27, 2015

Creating a table using Power Shell and SQL Server Management Objects

Review this previous post    http://hodentekmsss.blogspot.com/2014/11/accessing--
sql-server-via-smo-using.html

In the above post you will get an introduction to Power Shell and SQL Server
Management Objects. You also learn how to access the SQL Server and carry out a
few tasks like listing out all the databases.

Review this post for creating a database using Power Shell and SQL Server
Management Objects:
http://hodentekmsss.blogspot.com/2015/02/creating-database-using-power-shell-
and.html

In the above post you will learn how to create a new database in SQL Server using
SMO and Power Shell. Using Transact-SQL or the SSMS you can easily create a
database. Using PowerShell is another option to create a database using a script.

Having created a database you would want to create tables in the database.

This post shows how you may create a table. This script has been tested to work with
Power Shell ver. 4.0.

Launch SQLPS from Start | Run and type-in SQLPS and click OK.


PS_SMOTable01.png

Let us get connected to the instance of SQL Server (RegencyPark) on this computer
(Hodentek8) by (declaring) running the command shown.

PS SQLSERVER:\>  $server= new-object Microsoft.Sqlserver.management.smo.server
'Hodentek8\RegencyPark'

Let us create a database named 'Feb6'.
Declare a name for the database as shown here:
PS SQLSERVER:\SQL\HODENTEK8\REGENCYPARK> $dbname= "Feb6"

Now create a database object variable in the instance using SMO:
PS SQLSERVER:\> $db=new-object  Microsoft.Sqlserver.management.smo.Database
($server,$dbname)

Now create the database using the create () function.
PS SQLSERVER:\>  $db.Create()
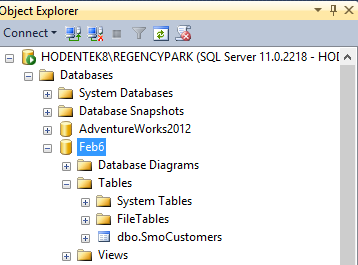
When you run the above command you will have created a database called Feb6 in the
SQL Server instance as shown (this may take a few seconds and you will not get any response except if there are errors) in SQL Server Management Studio:


PS_SMOTable02.png

In creating the table run the following lines of command in PS SQLSERVER:\>:

We declare a name for the table as 'SmoCustomers' and instantiate the table object
by running the following:
$tbname = "SmoCustomers"
$tb = new-object  Microsoft.Sqlserver.management.smo.Table ($db, $tbname)

We assume the table to have three columns (fields) named 'Field1, Field2 and
Field3. Field1 is of int data type and the two others are nvarchar(num) data type.

Typically instantiate a column object and its data type and add that column to the
$tb.Columns. Carry out this for the three columns by running these lines in PS
SQLSERVER:\>.

$colField1 = New-Object Microsoft.SqlServer.Management.Smo.Column ($tb, "Field1")
 $colField1.DataType = [Microsoft.SqlServer.Management.Smo.Datatype]::Int
 $tb.Columns.Add($colField1)


$colField2 = New-Object Microsoft.SqlServer.Management.Smo.Column ($tb, "Field2")
 $colField2.DataType = [Microsoft.SqlServer.Management.Smo.Datatype]::NVarchar(25)
 $tb.Columns.Add($colField2)

$colField3 = New-Object Microsoft.SqlServer.Management.Smo.Column ($tb, "Field3")
$colField3.DataType = [Microsoft.SqlServer.Management.Smo.Datatype]::NVarchar(25)
$tb.Columns.Add($colField3)

Now create the table by running the following code:
$tb.create ()

 
Here is the complete line-by-line code:
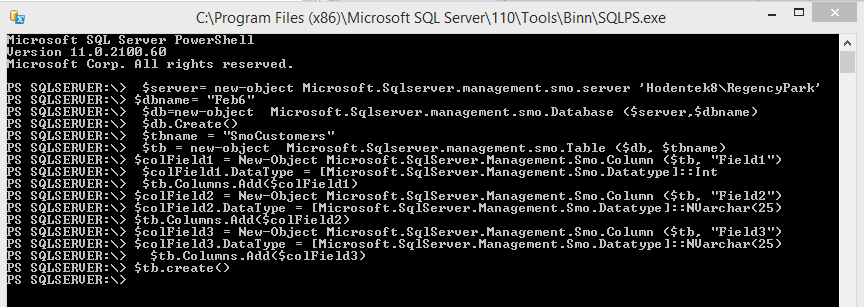
PS_SMOTable03.png
Again do not look out for a response but check for the table in Feb6 database you
created earlier.


PS_SMOTable04.png
Monday, March 16, 2015

Manage your investments with SQL Server 2014 backend using Abacus

Manage your investments with SQL Server 2014 backend using Abacus
Prism Cybersoft has launched an Azure Cloud based investment accounting software with SQL Server 2014 backend. It will cost you $600/yr.

The novelty is it is cloud based. Is security a problem, Perhaps?
With abacus you can monitor your investment portfolio across various asset classes like equities, derivatives, mutual funds etc. and generate various kinds of reports. Managing it is easy from manual to file uploads or direct integration with stock brokers back office.
According to the CEO of Abacus,
“Abacus allows investors to monitor their financial assets across various asset classes like equities, derivatives, mutual funds, and bank fixed deposits. It also generates various financial statements like balance sheet and profit and loss account,”
More here:
http://www.prism.in/services.html
http://www.infotechlead.com/cloud/microsoft-azure-powers-investment-software-abacus-28750

When Identity Security Becomes a Wall — Not a Shield

After a breach that forced a reset of my digital identity, I hit a roadblock I never anticipated: multi-factor authentication (2FA) locked m...