Tuesday, July 22, 2014

July 2014 Update to SQL Server Data Tools

Latest release of SQL Server Data Tools(SSDT) is now available here:

http://msdn.microsoft.com/en-us/data/hh297027

This update is now available for Visual Studio 2012 and 2013

Instead of the above link you can also get it from inside Visual Stuido 2012 via Tools -> Extensions and Updates->Updates.

What's new in this:
Of course more bug fixes and some of the following enhancements:
  • Schema Compare update
         Added MSBuild support for Schema Compare with text and XML output.  A blog post is    available with more information.
  • Improved Windows Azure SQL Database node in the Server Explorer
        Added Token-based authentication using a Microsoft account (MSA) or organizational account (OrgId)
        Added supported for VS2012
  • Improved (Parallel Data Warehouse) PDW support
       PDW tooling is now part of the Microsoft Visual Studio Express 2013 for Windows Desktop SKU.  This requires the VS 2013 Update 2 or later to be installed
      Support for PDW appliance updates in both VS2012 and VS2013

Also read:
http://brianwmitchell.com/2013/11/sql-server-to-pdw-migration-whitepaper/

SSDT for SQL Server 2014 here:
http://hodentek.blogspot.com/2014/03/sql-server-data-tools-to-go-with-sql.html

SSDT BI_Templates here:
http://hodentek.blogspot.com/2013/10/ssdt-bi-templates-for-sql-server-2012.html

SSDT Web Site:
http://msdn.microsoft.com/en-us/data/tools.aspx

Monday, July 14, 2014

SQL Server 2012 Developer Edition: Part 1 Installation

You could get to install a free version of SQL Server Express 2012 without an expiry date but it is not like using all the features available in a Enterprise edition. You could get a few more things in SQL Server 2012 if you install the Express edition with Advanced features. You may also get a Enterprise edition for free, but it is limited for 120 days. What do you do after 120 days, put your system clock back?

The better choice is SQL Server 2012 Developer edition and it has all the features of an Enterprise edition. The downside is you will have to pay for it. It can cost anywhere from $30 to $60 depending on the source. I have had problems with the evaluation editions before and I decided to go for Developer edition.

Some details are here as to where you can download:
http://hodentek.blogspot.com/2014/07/developer-editions-are-better-choice.html

It is also a good training software for a group of say, unemployed folks looking to find a job in the area of SQL Servers. They could buy a developer edition (and each member installing the express edition on his/her laptop/desktop) and use it is a group sharing cost and getting very good (on-the job) training working as a group; checking out features that are available, etc. According to Microsoft the full feature set is available in the Developer edition, except that you cannot use it in production.

 I have described the installation steps many times and one as recently as this:
http://hodentek.blogspot.com/2012/05/sql-server-express-2012-and-localdb.html

I will only make brief remarks for some of the screen shots. The installation is described in great detail in my two books, the first one with SQL Server 2008 and the second with SQL Server 2012.

         
SSRS 2008                                                                                                                     
 
Here I started off with a CD that I purchased from Microsoft Store. The installation was on a Toshiba Laptop computer with Windows 8.1 Professional OS with enough memory. 
As soon as the CD is ready either open the setup.exe or just let it auto play. The first screen you get is the SQL Server Installation Center. Here on the right you can access a lot of information and if it is the first time click on the links and read as much as possible, especially the hardware and software requirements. This is the planning navigation link you find on the left of the screen


Click on the New Installation.. on the right. You will be installing a new named instance of SQL Server.
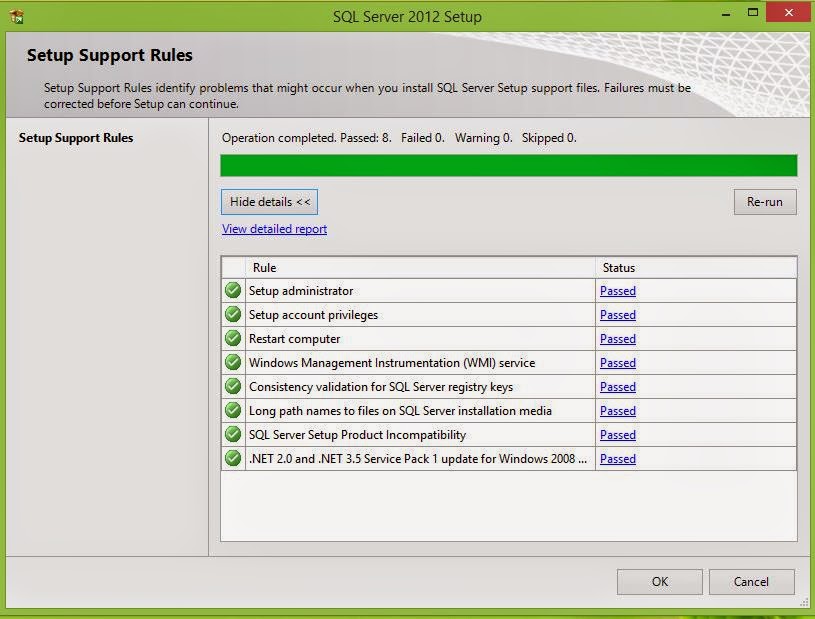
After some processing you will get the Setup Support Rules page where the checks are made. If you do no succeed you may have to full fill the requirements and try again. When it passes all tests you get a screen as shown.
 
 
Click OK. Enter the Product Key and click Next>.


Accept the License  terms (2 check marks ) and click Next


At this point if there are updates they can be downloaded (assumes you are connected to the Internet ) and installed (after you click Next>).

 
 The following is the link to KB Article of the download.

 
Read the notes on this page. The setup rules will be checked. Correct them if necessary and click Next>.

 
 If you click on thee link, for example the one or Windows Firewall you get a message as shown.


In the displayed page you will choose a role for the installation. Choose the option (SQL Server Feature Installation)  shown in the next screen.
 
 
Click Next to display the Feature Selection page shown here. Here all features have been selected. If you click on nay of them, description of what it is, is displayed on the right and the requisites are also shown.


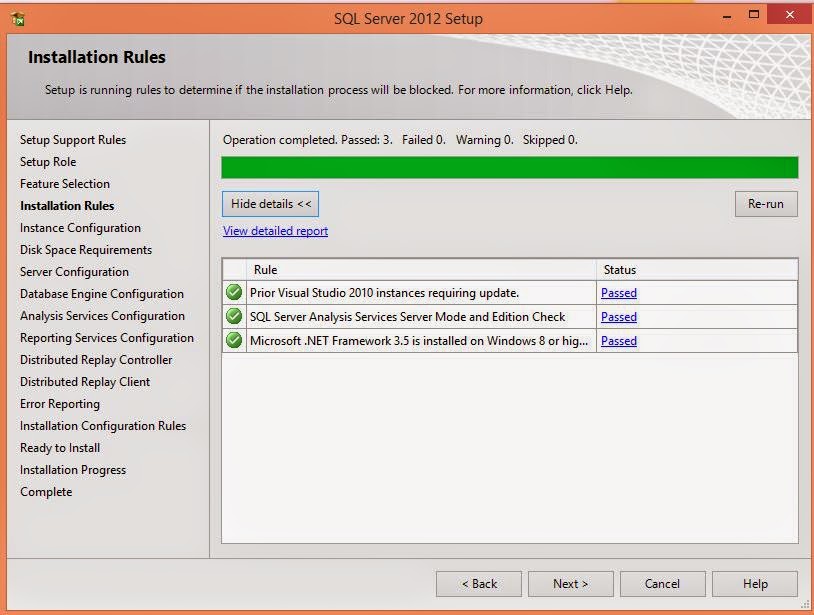
Click Next. Installation rules will be checked as shown. You may consider these as requirements for the installation. If it is lacking you should correct and try again.


Click Next. In the Instance Configuration page you can either create a Named Instance or a Default Instance. For a named instance you can provide your own name. Herein RegencyPark. Some of the text-boxes gets auto filled.

 
If you had had a previous instance it will show-up in the Installed Instances box. Click Next to find if you have enough resources to install in terms of disk space.


Click Next>. You will have to set up the Server configuration for the various components. Microsoft recommends a separate user/login. However, it is best to use the same account/password for all on a single machine which is going to be used by one or two persons. Moreover such caution is not necessary as it is not a production server.

 
In this installation the Windows Administrator (who happens to be the Current User) will administer the SQL Server. His user name/password is registered in the computer. You will be better off hitting the <browse..> button to get to the screens shown here to indicate the Window Login is the current user for all the serer components. Hitting Advanced button brings up the screen on the right. Hit on Find Now and get the drop-down shown where you can select.

 
The Selected User gets added and updates the screen as shown.

 
Click OK

 
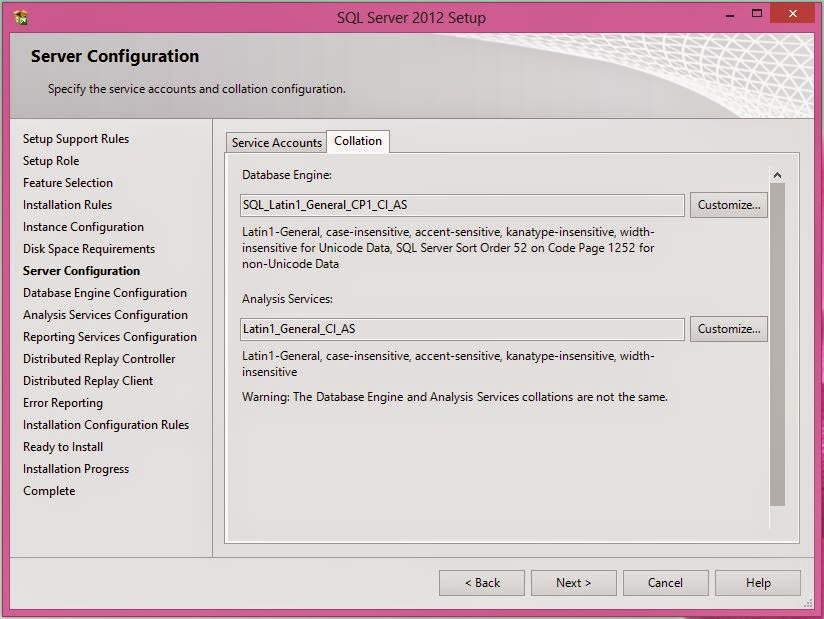
You may have to do this procedure for each of the component that needs username/password. When all of them are set up with username/password click the Collation tab and accept the default.


Click Next to display the Database Engine Configuration page. It has three tabs. In the Server Configuration you need to make the choice of the administrator. Choose Windows Authentication (you could also use the other option, herein the Windows Authentication is chosen). Click Add Current User and the Windows Administrator will be added. You could also add others if they have Windows Login accounts for the computer. You can also remove an existing one. Since this is the first time, only one user is added.

 
In the Data Directories tabbed page you will see the location of various files and you could change the default locations using the ellipsis buttons on this page.
 
 
In the next tabbed page make changes as shown for File Stream.

 
Click Next>. You will added the same administrator for Analysis Services similar to what you carried out earlier. Clicking on Add Current User will suffice. There are two modes from which you need to choose one. Herein the Multidimensional and Data Mining Mode is chosen. The SQL Server 2012 Reporting Services book describes in detail these modes of Analysis Services.

 
The Data Directories tabbed page show where the files are stored and they can be changed as well if necessary.


Click Next. brings you to the Reporting Services configuration page. Choose the option shown. Again the different options for reporting services is described in great detail in the two books whose links were provided earlier.


Click Next and accept the default. Add Current User.

 
In the Distributed Replay Client page provide a name for the controller (your choice).

 
Click Next. and accept to allow Microsoft get access to some information. This is pretty safe.

 
Click Next. The Installation Configuration rules will be checked to make sure that there are no blocking issues.


Click Next and you will see the various components\ sub-components that will be installed.

 
Click Install and the Installation Progress screen is displayed. This may take quite some time and do not pull out.


Finally you get the installation success page as shown.

 
In Part 2: Installation verification


Tuesday, July 8, 2014

Creating a linked server to SAP/Sybase SQL Anywhere 16 server in SQL Server 2012 Express

Linked servers offer the following advantages as noted in MSDN documentation:

•The ability to access data from outside of SQL Server.
•The ability to issue distributed queries, updates, commands, and transactions on heterogeneous
data sources across the enterprise.

•The ability to address diverse data sources similarly.
There are two ways to create Linked Servers in SQL Server 2012.
  • Using SQL Server Management Studio(SSMS)
  • Using the sp_addlinkedserver stored procedure(T-SQL)
In this post a Linked Server to Sybase(SAP) SQL Anywhere Server 16 will be created using SSMS  
 in SQL Server 2012 Express. Both the servers are installed on Windows 7 Ultimate
(x64bit) Toshiba Laptop computer.

Required information for SQL Anywhere 16
If you do not have SQL Anywhere 16, you can download the free developer version here after
registering:
http://sqlanywhere-forum.sap.com/questions/15828/its-here-sql-anywhere-16-developer-edition--
download

When you install SQL Anywhere 16 on your computer you can access the servers from the shortcut
shown here:


When you double click the Network Server (64-bit) you would be starting the server. The server details can be seen on the starting screen:


From this server  you get the information:

Servername: demo2
Port on localhost: 2638
Name of database: demo.db

SQL Anywhere 16 installation also brings in ODBC drivers, both x32 bit and x64bit. On a Windows
(x64) machine you can access both of them in separate ODBC Manager screens. To access
their shortcuts enter ODBC in the Start | Search screen. From here you can choose either of them.

However if you start from Control Panel | System and Security | Administrative Tools |ODBC Manager the x64bit version is displayed as shown:


During SQL Anywhere 16 installation a  System ODBC DSN - SQL Anywhere 16 DEMO  is also installed as shown.


Creating a linked server in SQL Server 2012 Express

It was not clear that a linked server can be created in SQL Server 2012 Express. Not a word about
Linked Servers in the features supported by SQL Server 2012 was available:
http://msdn.microsoft.com/en-us/library/cc645993(d=printer,v=sql.110).aspx#SSIS

However under Server Objects node in SQL Server you can find Linked Servers with the following providers that allows you to create linked servers with other vendor databases such as SAP, Oracle, DB2 etc.


In order to begin the process of creating a linked server right click Linked Servers node and click New Linked Server...

This opens up a window with three pages (General, Security and Server Options) as shown.


General Page:
In the General page you provide a name (your own: Herein Test_SAP) for the Linked Server.

For provider the default is Microsoft OLE DB Provider for SQL Server. You can click the drop-down
and select Microsoft OLE DB Provider for ODBC or Sybase(SAP)'s SQL Anywhere OLE DB Provider
16 (SAOLEDB.16) from the drop-down list shown.


Although  Microsoft OLE DB Provider for ODBC (aka MSDASQL) can be used for creating a linked
server,  you will not be successful because there is no (x64) version of this for Windows 7 (x64). If you are on a Windows Server 2003, or a Window's Vista machine there are URLs on the Internet where you can download them.

Going forward, the post uses the SAP's SQL Anywhere OLE DB Provider 16.

Choose the SQL Anywhere OLE DB Provider 16  from the drop-down list.

The Product name is optional and you can type in anything.

For the Provider string use the following:
Server: demo16; dbf: demo.db --Info from the server earlier

For the Data source, use the System ODBC DSN: SQL Anywhere 16 DEMO -from ODBC Manager

For Location (which only gets enabled after you choose SQL Anywhere OLE DB Provider 16) enter the following:
Localhost:2638 -- from demo 16 screen

For Catalog: enter demo

The completed screen of the General page is as shown:


Security page:
In the Security page enter the credentials to access the sample database demo (login: dba,
password: sql--case sensitive) on demo 16 server as shown


Server Options:
In the Server Options page make entries as shown here:


You have to enable RPC and RPC-Out options (I am still studying this)  as shown above.

Allow Inprocess option for the provider:

You also need to enable Allow Inprocess option for the SAOLEDB.16 provider.

Access the SAOLEDB.16 provider from Linked Servers | Providers node. Right click SAOLEDB.2 and open the property page as shown and enable 'Allow Inprocess' option.


Now this completes the creation of a linked server. Click OK on the New Linked Server page. 

A new linked server Test-SAP will be created in the Linked Server's node displaying the objects in the 'demo' database on the SQL Anywhere 16 server demo16 as shown.


The first two tables owned by DBA are not in the sample database that you get after installing the
SQL Anywhere 16 server. These were created during another study to connect SQL Anywhere 16
server to OpenOffice and LibreOffice programs. These can be accessed here:

http://hodentek.blogspot.com/2014/02/libreoffice-42-does-better-than.html

This post greatly benefited from discussions and suggestions from moderators (Volker Barth and Breck Carter ) on the SAP forum.

Here are some helpful links;
MSDASQL:
http://social.msdn.microsoft.com/Forums/sqlserver/en-US/46dc0747-4006-429a-85f0-
fd976d75bae9/is-there-a-msdasql-64-provider-on-windows-7-ultimate-x64-bit-os?
forum=sqldatabaseengine#cb4dc072-899e-4689-879f-11312c920c7b

Link to Linked Server for Sybase IQ 16 on Solaris:
http://arbime.wordpress.com/2013/11/14/ms-sql-2005-create-a-link-server-to-sybase-iq-16/

Get all my linked server articles here:
http://hodentek.blogspot.com/search?q=linked+server

Get all my SQL Anywhere articles here:
http://hodentek.blogspot.com/2013/08/looking-at-sql-anywhere-after-long-break.html

Thursday, July 3, 2014

How do you import data from SQL Server 2012 to MS Excel?

Why do we need to import data into MS Excel? If we need to use the number crunching power of
Excel then we need to get the data from the SQL Server to MS Excel.

The following steps show you how to import.

Microsoft Excel [herein using Microsoft Office 2010 Professional Plus (x32bit) on a x64bit
Windows 7 Ultimate] has a Data tab in its ribbon as shown.

There are different ways you can get the data from SQL Server.

In this post importing data from
SQL Server 2012 using MS Query will be described.

Click on From Other Sources and in the drop-down click on From Microsoft Query.
This will require an ODBC Connection information.


How do you create an ODBC connection to SQL Server 2012?
Follow this link for a step-by-step procedure:
http://hodentekmsss.blogspot.com/2013/08/how-do-you-create-odbc-dsn-to-sql.html

When you click on From Microsoft Query the following window, Choose Data Sources window is displayed:

I have created several ODBC datasources over a period of time and the most recent one is to SQL Server 2012 with the name, sqlSrvr2012* at the very bottom.

Click on sqlSrvr2012 and click OK.

The Choose Columns of the Query Wizard will be displayed. You can see many columns even those including from System. Scroll down to the one you want to import (herein, Product Sales for 1997).


Click on that column and click on the symbol > between the two panels to bring over the columns to the right panel as shown.


Click Next to reveal Filter Data of the Wizard as shown:


Accept the default (no filtering) and click Next.
The wizard's Sort Order window is displayed as shown:


Accept the default (no sorting) and click Next.

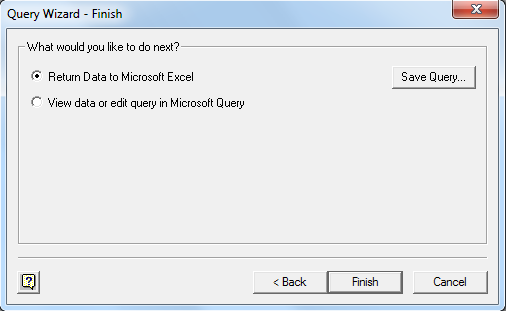
Query Wizard's Finish screen is displayed as shown. Here you can get the data into MS Query window( open all the time we were working with the Wizard) or get it into Excel as shown.


Accept the first option and click Finish. You may also save the query if you like.
The program takes you to the Excel's sheet with the Import Data screen asking you how and where to display the imported data. The options are Table (into a table structure) beginning in the column $A$1. Both of them can be changed.


Click OK and after a brief processing the imported data will appear as shown:

Enjoy!

Mahalo


Install the latest version of SQL Server Management Studio 20.2

This is the latest version of SQL Server Management Studio [build no:20.2.30.0, released July 9,2024]. Note: it is not an upgrade to SQL Ser...