Friday, March 31, 2017

SQL Server vNext is SQL Server on Linux

Many CTP's have been released for SQL Server vNext and looking at the pace, the importance of this reflects the zeal of Microsoft's drive towards Open source and acceptance by a vastly larger audience.


The latest CTP, CTP 1.4 is supported on the following Linux platforms:


RHEL 7.3
https://access.redhat.com/products/red-hat-enterprise-linux/evaluation

SUSE Linux Enterprise 12:
https://www.suse.com/products/server/

Ubuntu 16.04:
https://www.ubuntu.com/download/server

Docker:
https://www.docker.com/get-docker (Community Edition is free)

Bottom line requirements:
You need a minimum of 3.25GB and the file system must be XFS or EXT4

Installation details here:
https://docs.microsoft.com/en-us/sql/linux/sql-server-linux-setup

Monday, March 27, 2017

SQL Server PolyBase engines starts and stops in SQL Server 2016 - Part 2

Tried various suggestions from the SQL Server 2016 forum. However none of the checks / measures reveal the reason for this behavior.
According to documentation one can confirm whether Polybase is installed or, not by running the query:

SELECT SERVERPROPERTY ('IsPolybaseInstalled') AS IsPolybaseInstalled;

You should get 1 if it is installed, or 0 if it is not.


However, the problem arose when there was a third answer to the above query.


The above query runs and the response is as shown.


Immediately after this you get a screen to save the response. If you do indicate a location to save the response, the program saves it to a file with the extension .rpt.

The report file can be opened with Notepad which is just the message in the response to this query shown above.

While this problem was being examined on the machine there was an update to the OS on March 23, 2017.

This morning when I tried again to start the Polybase server, there was no problem. It started without any error messages.

However, after making sure the Polybase was up and running, I tried the 'IsPolybaseInstalled?' query and I still get the same third option.


Creating a database in Ultralite 17 using SQL Central

In this post I describe the steps to create a database with all the default settings using the SQL Central interface. If you are new to SQL Central (was previously called Sybase Central) you may want to read my older posts here.

Launch SQL Central from All Programs under SQL Anywhere 17.
Click Tools and choose under UltraLite to create a database as shown.


Create_00.png

 Creating a database is driven by the Wizard which appears as soon as you click Create Database... in the above window. The following sequence of windows shows how the database is created. Although you can make many changes to the database settings, all defaults are used in this post.

You start with the welcome window. Read the notes here.


Click Next,


Use the Browse... button to find the location for the database you are going to create and provide a name. Herein the name is Mar25_2017.

Click Next. Accept the default storage settings.

 Click Next.
Next choose the Collation and character set. Herein Ultralite defaults are accepted.

 Click Next.
Accept the default creation parameters. Have a look at what they are (these are Ultralite defaults).
You can change any or all of them.

 Click Next.
You may leave this as is. Synchronization is important for synchronizing the UltraLite with the main server. For the moment you may leave this empty.


 Click Next after placing a check mark for connecting to the new database. This makes the database available in the SQL Central Management interface.


 Click Next. Oh! you get the command line way of creating this database. What the wizard delivered is the execution of the command line with the parameters (Switches) shown here. This is neat. Next time around you may just use the command line.


 Click Close. The database is created and now appears in the SQL Central under Ultralite 17 (Compare this to the very first image in this post)


Here is the Properties page for this database. Presently it has objects such as Tables, Users etc.


Saturday, March 25, 2017

Installing Report Builder for SQL Server 2016

Download Report Builder 3 for SQL Server as described in my previous post .

You will have downloaded the ReportBuilder.msi file published on 3/9/3017. Note that there are other Report Builder.msi related to other versions (for example ReportBuilder.msi for SQL Server 2014 etc).

The installation is driven by a wizard and it installs without any problem. You need not indicate a Reporting Services Report Server during installation.


Here are screen shots of the installation:

Welcome Screen


License agreement window. Click I Accept...


 It will be installed on the local hard drive. Note that this product may also work with SQL Server vNext CTP1.3.


SQL Server 2016 reporting services has two modes and you need not have these installed and configured. You may keep this empty. Click Next.


Click Next and you are ready to install.


 Click Install. Begins installing with a progress screen.


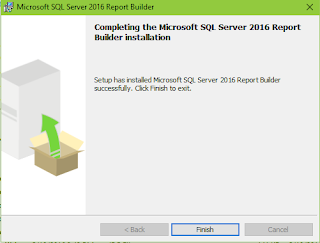
 It is done installing.


 You should see these in All Programs on Windows 10.


Double click and you are ready to Author a report. If you want to put it out on the Report Server, you need a Report Server.

You are ready to go!

Importing a CSV file into SAP's SQL Anywhere 17 - Part 2

An error in import is corrected in this post.

In my previous post on the above I did not correctly associate the date related fields with the correct data type. The correct date and time related fields must be associated with the 'timestamp' field. This particular data type is not present in SQL Server which lead to this incorrect assumption.

In the following image you should scroll and find timestamp to associate with data type.


Sap_14.png
Once you do this association and follow through the wizard you end up with the correct result as shown.


Sap_13.png

You can check the following generated code in the Interactive SQL by steeping back on the query using the right and left arrows at the top.


Sap_15.png

CREATE TABLE "DBA"."FFD_Mar25_2" ("ProductName" varchar(254) NULL,"UnitPrice" smallmoney NULL,"Quantity" tinyint NULL,"OrderDate" timestamp NULL,"RequiredDate" timestamp NULL)

--  Generated by the Import Wizard
input into "DBA"."FFD_mar25" from 'F:\\FFDL.csv' format text escapes on escape character '\\' delimited by ',' encoding 'Cp1252' skip 1


I thank John Smirnios of

Friday, March 24, 2017

Timestamp data type in database servers


Timestamp data type is one of the data types that can create problems which migrating data from one kind of server to another. Although most database products consider timestamp as a data type, Microsoft SQL Server does not consider it as a data type. Some databases just store date information in text, integer and real.

Review the following taken from various database products:


SQL Server:
SQL Server 2000. timestamp is a data type that exposes automatically generated binary numbers, which are guaranteed to be unique within a database. timestamp is used typically as a mechanism for version-stamping table rows.

MySql:
The TIMESTAMP data type is used for values that contain both date and time parts. TIMESTAMP has a range of '1970-01-01 00:00:01' UTC to '2038-01-19 03:14:07' UTC.

Oracle:

 
Timestamp.png


DB2:

A timestamp is a seven-part value representing a date and time by year, month, day, hour, minute, second, and microsecond, in the range of 0001-01-01-00.00.00.000000000 to 9999-12-31-24.00.00.000000000 with nanosecond precision. Timestamps can also hold timezone information.

PostgreSQL:
The timestamp data type allows you to store both date and time. However, it does not have any time zone data. It means that when you change your database server’s time zone, the timestamp value stored in the database does not change.

The timestamptz data is the timestamp with time zone. The timestamptz is a time zone-aware date and time data type. PostgreSQL stores the timestamptz in UTC value. When you insert a value into a timestamptz column, PostgreSQL converts the timestamptz value into a UTC value and stores the UTC value in the table.

SQL Anywhere 12:
The fraction is stored to 6 decimal places. A TIMESTAMP value requires 8 bytes of storage.

Although the range of possible dates for the TIMESTAMP data type is the same as the DATE type (covering years 0001 to 9999), the useful range of TIMESTAMP date types is from 1600-02-28 23:59:59 to 7911-01-01 00:00:00. Before and after this range the time portion of the TIMESTAMP may be incomplete.

When a TIMESTAMP value is converted to TIMESTAMP WITH TIME ZONE, the connection's time_zone_adjustment setting is used for the time zone offset in the result. In other words, the value is considered to be "local" to the connection. When a TIMESTAMP WITH TIME ZONE value is converted to TIMESTAMP, the offset is discarded.

SQLite:
No timestamp. Even date/time are stored as Text, real or integers
"SQLite does not have a storage class set aside for storing dates and/or times. Instead, the built-in Date And Time Functions of SQLite are capable of storing dates and times as TEXT, REAL, or INTEGER values:

    TEXT as ISO8601 strings ("YYYY-MM-DD HH:MM:SS.SSS").
    REAL as Julian day numbers, the number of days since noon in Greenwich on November 24, 4714 B.C. according to the proleptic Gregorian calendar.
    INTEGER as Unix Time, the number of seconds since 1970-01-01 00:00:00 UTC. "

Netezza:
Type_name       DataType              Precision   Nullable   Case Sens   Maximum Scale
DATE               91 [DATE]           10               true           false            0
TIME               92 [TIME]            15               true           false            6
TIMESTAMP  93 [TIMESTAMP]26              true           false            6

Download Report Builder for SQL Server 2016

Report Builder is a highly productive, stand-alone tool for authoring reports and deploying them on configured Microsoft Reporting services report servers. It can use data from different kinds of data sources to produce  a variety of reports, from hard copies to web based reporting.

Report Builder 3 Details:
--------------
Version:
14.0.344.82
File Name:
ReportBuilder3.msi
Date Published:
3/9/2017
File Size:
22.6 MB
-----------------

You need Microsoft .NET Framework 4.5
. The memory and CPU requirements are average.

This is supported on  the following OSs:
Windows 10 , Windows 7, Windows 8, Windows 8.1, Windows Server 2008 R2, Windows Server 2008 R2 SP1, Windows Server 2012, Windows Server 2012 R2

download from here:
https://www.microsoft.com/en-us/download/confirmation.aspx?id=53613

Please review the earlier versions of Report builder in two of my published books here:


The second book Learning SQL Server 2008 Reporting Services is ideal for beginners who want to spin-out reports from a variety of data sources and deploy them to report servers. The book is replete with step-by-step, hands-on exercises where the users can hone their skills.


The fifth book Learning SQL Server Reporting Services 2012 is a revised edition and a deals with both Native and SharePoint Integrated modes of Report Servers. This covers every aspect of the first edition(second book) with lots of added material to include development in the intervening years.

  As the author of these Microsoft Business Intelligence related books I have great confidence in their usefulness. I would love to hear from you. Email me at: hodentek@live.com.

Saturday, March 18, 2017

Querying a SQLite database using the RSQLite Package

SQLite is a server-less SQL Database that does not require a separate server process. You do not need a configuration (Zero configuration) and it does not need any administration. The whole database is stored in a single cross-platform disk (or on your mobile device). It is very popular and widely used with mobile applications as the database is stored in the device and can be used without network connection. No external dependencies.

RSQLite is a R Package that is useful in manipulating a SQLite database. The Package can be downloaded from on of the CRAN mirrors. The one I got was from a mirror in France.
When you install the package you will be installing the following:


Packages.png

The RSQLite package has a built-in database with many tables called datasets db which is actually a file called datasets.sqlite.

In a previous post I described in detail creating a SQLite database table  using Visual Studio 2015 Community and an extension. The database created has an extension .db.

SQLite database can be extension .db or .sqlite. The database created using the Visual Studio 2015 called Sept27-2016.db was renamed Sept27-2016.sqlite.

After installing the package you can run the following code in RGUI to connect to the database created using Visual Studio by indicating the path to the .db file as shown.

---------------------
library("RSQLite")
Warning message:
package ‘RSQLite’ was built under R version 3.2.5

> db <-dbConnect(SQLite(),dbname="C:\\Users\\Jayaram\\Documents\\Blog2017\\MSSS\\SQLite\\RSQLite\\Sept17-2016.sqlite")

> dbListTables(db)
[1] "Sept22"
>
---------------------
Once you get the table, you can query as shown:

> dbReadTable(db,"Sept22")
[1] Id    Fname LName Age 
<0 rows> (or 0-length row.names)
> dbGetQuery(db, "SELECT * from Sept22")
[1] Id    Fname LName Age 
<0 rows> (or 0-length row.names)
---------------
Here is the table created in Visual Studio 2015 which has no data in it at present.


Tuesday, March 14, 2017

jTDS -SQL Server and Sybase JDBC driver

Accessing SQL Server using a JDBC driver is implemented in the package RSQLServer which appears to have been archived. Assuming we can get to RSQLServer package we still need jTDS driver.

jTDS driver can be downloaded from here:

https://sourceforge.net/projects/jtds/files/jtds/1.3.1/

The driver description as found on Sourceforge is as follows:

"Open source JDBC 3.0 type 4 driver for Microsoft SQL Server (6.5 up to 2012) and Sybase ASE. jTDS is a complete implementation of the JDBC 3.0 spec and the fastest JDBC driver for MS SQL Server. For more information see http://jtds.sourceforge.net/"

There are other options such as ODBC-JDBC Bridge and Microsoft's JDBC driver which are not totally free.

The latest version is jtds-1.3.1-dist.zip (551.2KB)

Monday, March 6, 2017

SQL Server PolyBase engines starts and stops in SQL Server 2016

In SQL Server 2016 you can connect to external data sources that includes the Hadoop clusters and Azure Blob Storage but you should have Polybase installed. SQL Server 2016 SP1 has PolyBase installed.

You can read all my Polybase related posts here:
http://hodentekmsss.blogspot.com/search?q=polybase

According to documentation one can confirm whether Polybase is installed or, not by running the query:

SELECT SERVERPROPERTY ('IsPolybaseInstalled') AS IsPolybaseInstalled;

You should get 1 if it is installed, or 0 if it is not.

In the local installation of SQL Server 2016 SP1 on this machine neither of these results were obtained.

The statement was executed but a browser window opened looking for files of type .rpt.

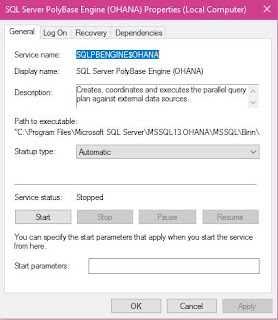
There are 2 services with Polybase installation on SQL Server 2016 SP1.

SQL Server Polybase Engine (Instance Name)
SQL Server Polybase Data Movement(Instance name)


These are Windows services that you find in the Control Panel in the Services window. Both of them are present in the Control Panel.

Unless you start the engine the service will not be available as mentioned while describing the testing query.


Polybase_00

Click Start to start the engine.
I get a message like this.


Polybase_01


Try running the test for Polybase installation again. Looks like the query opens up a Save Results window and looking for .rpt files.


Polybase_02

Perhaps this a bug or perhaps by design.

Trying to start the Polybase engine comes back with the message:

Polybase_04

Updated the java version by downloading jdk-8u121-windows-x64-demos from Oracle site as correct Java SE version is one of the requirements.


You will find the answer from me when I find it.


Saturday, March 4, 2017

Finding installed features after SQL Server 2016 is installed

The best way to find what features are installed when you installed SQL Server 2016 is to run a discovery report. The discover report table has the following columns:

Product
Instance
Instance ID
Feature
Language
Edition Type
Version
Clustered or not
Configured or not


How do you run a discovery report?

You can use the command line tool to run the report.
Run the following from command line prompt:

C:\Program Files\Microsoft SQL Server\130\Setup Bootstrap\SQLServer2016>setup.exe /action=RunDiscovery

This generates the discovery report and places it in the log folder.

C:\Program Files\Microsoft SQL Server\130\Setup Bootstrap\Log


This generates the report (an htm file) in the following directory:
C:\Program Files\Microsoft SQL Server\130\Setup Bootstrap\Log\20170304_105325>

Where 20170304_105325 is the last session (or the session for running the discovery)


 You may now go to the above directory and open the htm file in your usual browser (the whole screen is not shown).


Thursday, March 2, 2017

Using a Bacpac file to construct the Wide World Importers Database

In my previous post I showed you how easy it is to bring the Wide World Importers (WWI) database into a named instance of SQL Server 2016 SP1 on your computer(desktop / laptop).

In this post I describe how you may construct the database on the named instance using a BacPac file.
If you have not used this kind of file please review the following link here.

In what follows I describe using the .bacpac file to construct the WWI database
Go here:
https://github.com/Microsoft/sql-server-samples/releases/tag/wide-world-importers-v1.0

Get this bacpac file:
Azure SQL Database Standard tier

    WideWorldImporters-Standard.bacpac - standard edition OLTP sample database in bacpac format. For Azure SQL Databases in the Standard tier.


Download the 58.4 MB file from the above site.


SQL Server 2016 SP1 like the other versions has a wizard to bring the database using a .bacpac file such the one you downloaded.

You invoke the wizard as shown in the next image and follow through.


bakpacWWI_01.png

Click Import Data-tier Applicaiton... to open the window shown in the next image.  Read the steps in this introductory page.


bakpacWWI_02.png

 Click Next. You click the Browse... button to locate the  indicated file. This is the location to which I saved the WideWorldImporters-Standard.bacpac file. 
It does not matter it is for Azure SQL Database.


bakpacWWI_03.png

After getting the file location from the location as shown in the next image proceed to next step.


bakpacWWI_04.png


After getting the file location in the wizard's interface (the image one above the previous) click Next.


bakpacWWI_05.png

 Just verify that the location for files are what you want. Herein defaults are accepted. You could browse and park elsewhere.

The database name was changed to WWI_Bacpac.
 
Click Next. The Summary of processing is presented as shown.


bakpacWWI_06.png


Click Next. The next four images shows the progress captured in images. Indexes are dropped and created, etc.

 bakpacWWI_07.png
 bakpacWWI_08.png
 bakpacWWI_09.png
bakpacWWI_10.png

Object explorer refreshed - last processing step.

The WWI database is imported successfully.

Here is the final verification of the import into the named instance.

bakpacWWI_10.png

SQL Server 2025 ready to go

 I have not yet done looking at SQL Server 2022, SQL Server 2025 is ready to go. Microsoft is indeed relentless!  Microsoft announced SQL Se...